


Scanning documents using the control panel (USB attach only)
55
Scanning documents using the control panel (USB
attach only)
1 Make sure:
• The computer is on.
• The computer is attached to the MFP.
• The software has been loaded onto the computer.
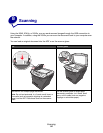
2 Load an original document face-up into the ADF or face-down on the scanner glass.
Note: Do not load postcards, index cards, small items, or thin media (such as magazine
clippings) into the ADF. Place these items on the scanner glass.
3 From the control panel, press Scan.
4 Press or repeatedly until the application you want to use appears.
Note:
• If you do not see the application you want to use, configure additional
applications for scanning. For more information, see Configuring additional
applications for scanning on page 56.
• Adjust the scan settings using the computer. For more information, see
Customizing scan settings on page 58.
5 Press Start.
The MFP scans the document.
6 If prompted, press 1 (for yes) if you have more pages, or 2 (for no) if you have finished
scanning the entire document.
Scanning documents using the computer (USB attach
only)
1 Make sure:
• The computer is on.
• The computer is attached to the MFP.
• The software has been loaded onto the computer.
2 Load an original document face-up into the ADF or face-down on the scanner glass.
3 Open QLINK:
• Double-click the QLINK icon on the desktop.