


17
Chapter 6: Configuring the PrintServer
The Protocol Tab - TCP/IP
PrintServer for USB with 4-Port Switch
The Protocol Tab - TCP/IP
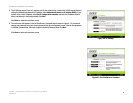
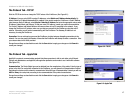
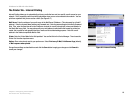
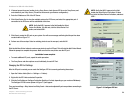
Click the TCP/IP tab to view or change the TCP/IP values of the PrintServer. (See Figure 6-2.)
IP Address. If you are using DHCP to assign IP addresses, select Obtain an IP Address Automatically. By
default, Obtain an IP Address Automatically is enabled. If you need to assign the PrintServer a Fixed IP Address
(also known as Static IP Address), select Use the Following IP Address, and enter the appropriate values under
IP Address, Subnet Mask, and Gateway. To find your router’s IP address, consult your router’s documentation.
The Device IP Address and Subnet Mask are the same as those of any PC connected to the network. If you
change the PrintServer’s IP address, make sure you that you reconnect to the PrintServer using that new IP
address. Otherwise, you will not be communicating with the PrintServer. The Gateway IP Address is not
necessary for using the PrintServer.
Connection. You can set how long you want the PrintServer to delay between attempting connections to the
network. You can also specify the number of times that the PrintServer will attempt to make a connection. Enter
your chosen values in the fields provided.
Change these settings as described here and click the Save button to apply your changes or click Cancel to
cancel your changes.
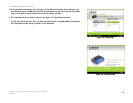
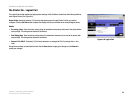
The Protocol Tab - Apple Talk
AppleTalk is a network communications protocol that allows computers to talk to each other using Ethernet.
Typically only Macintoshes use AppleTalk, although other platforms can be made to use it with extra software.
(See Figure 6-3.)
Communication. The Printer Object type can be obtained from the manufacturer of the printer. Enter the type of
printer in the field. For each printer connected to the PrintServer, you will choose the Communications Protocol
that allows the devices on the network to communicate. Select the type of Communication Protocol you will use,
ASCII or Binary for each printer, according to the recommendation of the printer’s manufacturer.
Change these settings as described here and click the Save button to apply your changes or click Cancel to
cancel your changes.
Figure 6-2: TCP/IP
Figure 6-3: Apple Talk