


5
ENGLISH
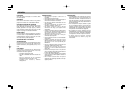
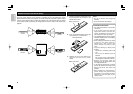
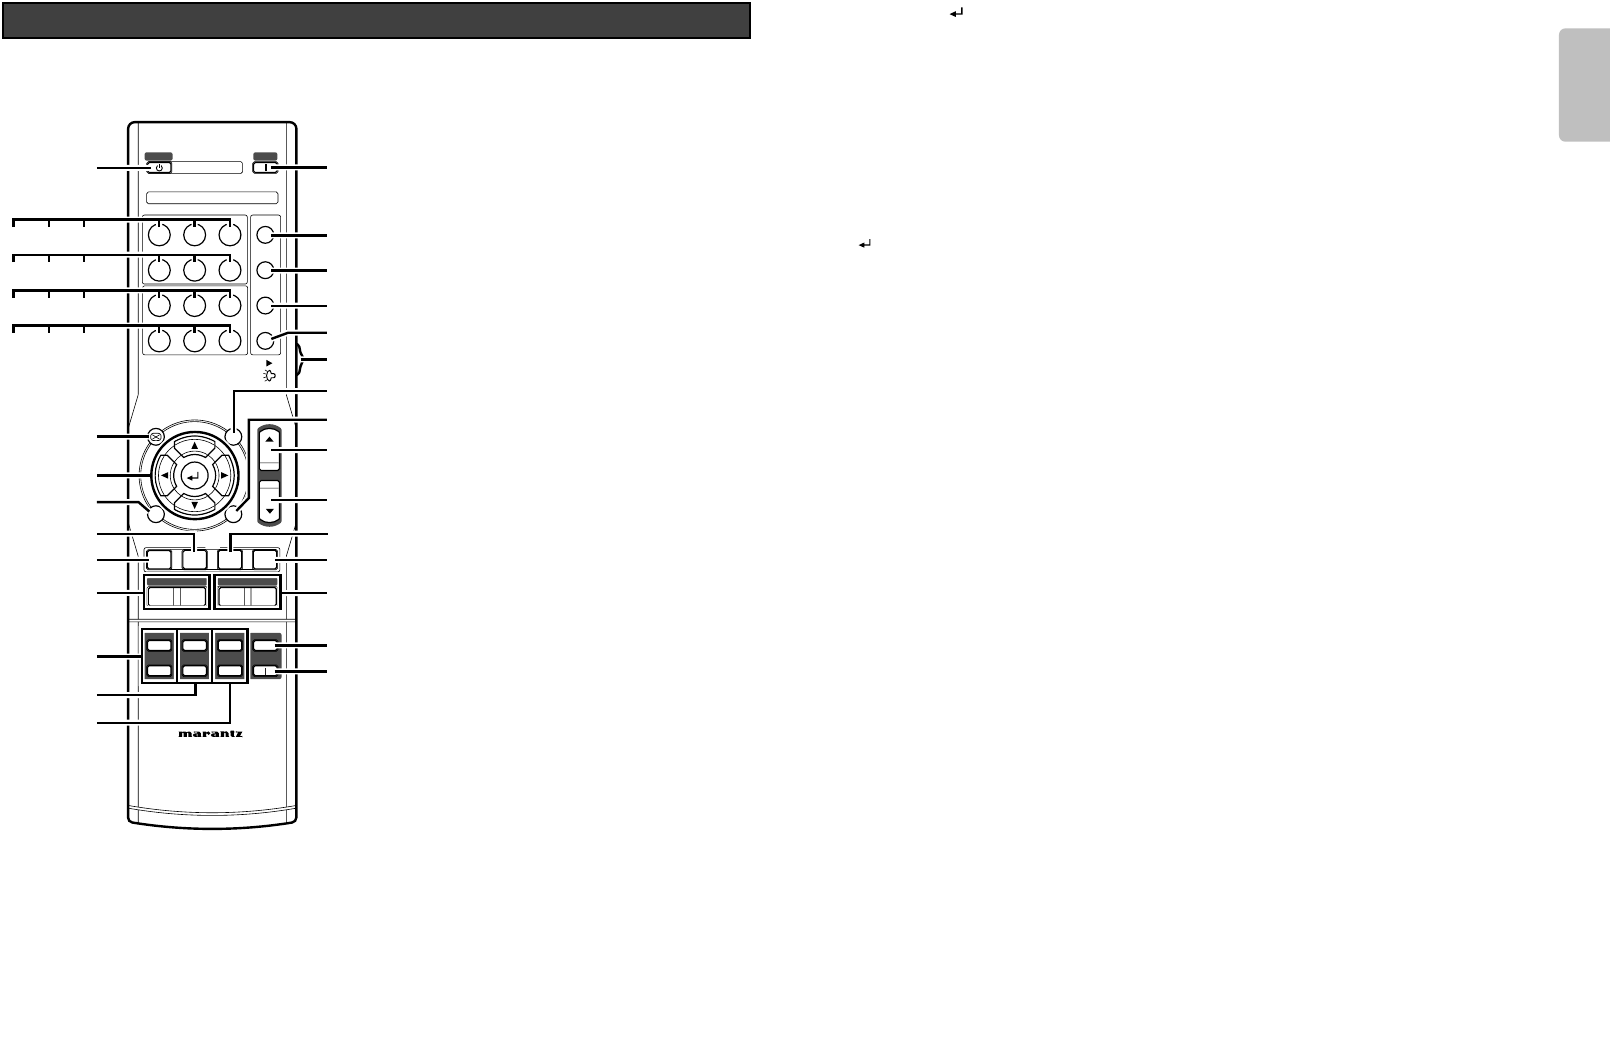
Remote Controller
INPUT
STANDBY
V-MUTE MENU
FREEZE
SHAPRAESS
TINT COLOR INFO.
SHA
+
TINT
+
COL
+
CON
-
ON/OFF
INPUT
PIP
SWAP MENU
CON
+
BRI
-
BRI
+
W-PEAK
PEAK
WHITE
SHA
-
TINT
-
COL
-
EXIT
ON
C1 C2 S F
DV1 RGB V N
THTR
STD DYN Z1
HB CT
E
M
F
Z2
LB
COMP.1 COMP.2 S VIDEO FULL
DVI RGB VIDEO NORMAL
THEATER STANDARD DYNAMIC ZOOM1
LOW HIGH-BRIGHT-
C-TEMP ZOOM2
CONTRAST BRIGHTNESS
RC8600VP
REMOTE CONTROLLER
@3
@4
@5
@6
@7
@8
#1
#0
#2
#6
#5
#4
#3
#7
@9
!9
@0
!8
!4
q
tyu
wer
io!0
!1 !2 !3
!5
!6
!7
@2
@1
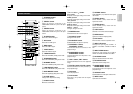
q STANDBY button
Turns the projector off.
w COMP.1 button
Select the devices connected to the
COMPONENT VIDEO IN 1 jack as the input
source.
e COMP.2 button
Select the devices connected to the
COMPONENT VIDEO IN 2 jack as the input
source.
r S-VIDEO button
Select the S-VIDEO IN signal.
t DVI button
Select the DVI-D IN signal.
y RGB button
Select the RGB IN signal.
u VIDEO button
Select the VIDEO IN signal.
i THEATER button
Select the THEATER (THTR) picture mode.
o STANDARD button
Select the STANDARD (STD) picture mode.
!0 DYNAMIC button
Select the DYNAMIC (DYN) picture mode.
!1 LOW BRIGHT button
Select the LOW BRIGHT (LB) picture mode.
!2 HIGH BRIGHT button
Select the High Bright (HB) picture mode.
!3 C-TEMP button
Changes color temperature setting.
!4 V-MUTE button
Makes the screen blank.
!5 3 / 4 / 1 / 2 / button
UP (3) button
Navigates and changes settings in the OSD.
DOWN (
4) button
Navigates and changes settings in the OSD.
LEFT (1) button
Navigates and changes settings in the OSD.
RIGHT (2) button
Navigates and changes settings in the OSD.
ENTER ( ) button
Changes settings in the OSD.
!6 FREEZE button
Freeze/unfreezes the on-screen picture.
!7 PIP-INPUT button
Changes the PIP source.
!8 PIP-ON/OFF button
Enables/disables PIP (picture-in-picture).
!9 CONTRAST+ button,
CONTRAST– button
Increases/decreases the contrast of the
projected image.
@0 SHARPNESS+ button,
SHARPNESS– button
Increases/decreases the sharpness of the
projected image.
@1 TINT+ button, TINT– button
Increases/decreases the tint of the projected
image.
@2
COLOR+ button, COLOR
–
button
Increases/decreases the color (saturation) of
the projected image.
@3 ON button
Turns the projector on.
@4 FULL button
Select FULL (16:9) mode from four aspect
ratio modes.
@5 NORMAL button
Select NORMAL (4:3) mode from four aspect
ratio modes.
@6 ZOOM1 button
Select ZOOM1 (1.88:1) mode from four
aspect ratio modes.
@7 ZOOM2 button
Select ZOOM2 (2.35:1) mode from four
aspect ratio modes.
@8 LIGHT button
Switches on the remote control backlight.
@9 MENU button
Opens the On-Screen Display (OSD).
#0 EXIT button
Exits the OSD, or returns to previous menu.
#1 INPUT UP button
Changes the input signals. COMP.1
➔
COMP.2
➔
S-VIDEO
➔
VIDEO
➔
RGB
➔
DVI
#2 INPUT DOWN button
Changes the input signals. DVI
➔
RGB
➔
VIDEO
➔
S-VIDEO
➔
COMP.2
➔
COMP.1
#3 PIP-SWAP button
Swap the window sources in PIP mode.
#4 PIP-MENU button
Open/close the PIP setting menu.
#5 BRIGHTNESS+ button,
BRIGHTNESS– button
Increases/decreases the brightness of the
projected image.
#6 W-PEAK button
Enables/disables the white peak enhancement.
#7 INFO. button
Open/close the Information.