


EN-49
Replacing the lamp (continued)
To replace the lamp:
A) When the projector is placed on the
table
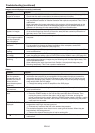
Make sure that the projector is securely held in place.
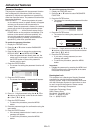
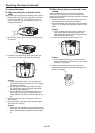
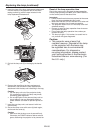
1. Remove the cover (a) of the screw fixing the lamp
cover with a fingernail. If it is difficult to remove
it with a fingernail, use a finetipped tool such as
flathead screwdriver.
(a)
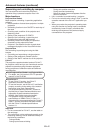
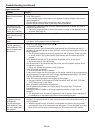
2. Remove the screw (b) and slide the lamp cover (c)
for removal.
(c)
(b)
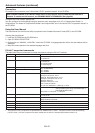
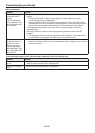
3. Loosen the two screws (d) of the lamp unit, and
then pull out the lamp unit (f) by the handle (e).
(f)
(d)
(e)
Caution:
• Whenreplacingthelamp,donotloosenthe
screws other than two screws (d). It may cause
the failure of projector.
• Pullthelampunitoutoftheprojectorslowly.
If it is pulled out quickly, the lamp may break,
scattering glass fragments.
• Donotspillliquidontheremovedlampunitor
do not place it near any flammable object or
where children can reach to prevent injuries or
fire.
4. Insert the new lamp unit, and secure it with two
screws firmly.
5. Secure the lamp cover with screw (b) back again,
and mount the cover (a).
Caution:
• Makesurethatthelampcoverissecuredfirmly.
Otherwise, the POWER indicator flashes red and
green, disallowing the projector to be powered
on.
B) When the projector is mounted to the
ceiling
When removing the lamp unit from the projector
mounted to the ceiling, never fail to use the lamp
replacement attachment to protect yourself from glass
fragments and so on.
• Contactyourdealerwhenreplacingthelampunit
with the projector mounted to the ceiling.
1. Remove the lamp cover referring to the procedure
1 and 2 of “A) When the projector is placed on the
table”.
Caution:
• When opening the lamp cover to replace the
lamp of the ceiling-mounted projector, pay
careful attention because glass fragments may
exist inside the lamp cover.
2. Loosen the two screws (d) of the lamp unit.
(d)
Caution:
• Whenreplacingthelamp,donotloosenthe
screws other than two screws (d). It may cause
the failure of projector.
3. Fold the three taping portions (g) of the lamp
replacement attachment along the folding line as
shown in the figure.
(g)