


Getting Started
NPort Server Lite User’s Manual 2-5
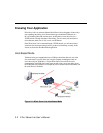
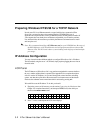
Network Connection
There are two ways to use the 10/100BaseT Ethernet jack located on NPort Server Lite’s
front panel (see Fig. 1-2):
1. For many of the applications using NPort Server Lite, you will simply plug one end of
your Ethernet cable into the 10/100BaseT jack, and the other end into the hub
connected to your network.
2. In some cases, such as when configuring drivers and software, you will find it
convenient to hook NPort Server Lite directly to your computer’s Ethernet card. To do
this you will need to use a “crossed-cable”, such as the one supplied with your server.
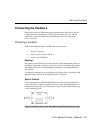
Power Connection
You should take the following steps to connect NPort Server Lite’s power adaptor.
1. Connect the power adpator’s DC plug into NPort Server Lite’s “DC-IN” jack.
2. Connect the power adaptor to an electrical outlet.
Note that there is no on/off switch. The server automatically turns on when plugged into the
outlet.
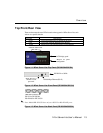
If the server is working properly the LCD panel back light will glow for a few seconds
before shutting off, and the green PWR LED will also light up, indicating that the server is
receiving power. The LCD panel should look similar to what is shown in Figure 1-1.
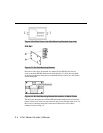
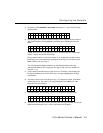
Serial Connection
The model of NPort Server Lite that you purchased has either two (models DE-302/332) or
four (models DE-304/334) DB9 serial port jacks on the back panel (see Fig. 1-3).
Depending on your serial device and serial interfaces, there are two options:
1. For an RS-232 port you may use a DB9 to DB9 cable to connect your serial device to
NPort Server Lite. Simply plug one end of the cable into the jack on the back panel of
the server, and plug the other end into the serial port jack on your serial device.
2. Refer to Appendix C for details on NPort Server Lite’s DB9 pinouts, and then make
your own cable.