


Chapter 1 – Introduction
RouteFinder RF500S User Guide 14
Check Assign Remote Site an IP Address and enter the IP Address:
192.168.100.1
Check Allow Remote Dial-in
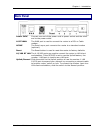
Click the
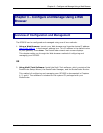
Remote Authentication Settings button if you want to authenticate
with user name and password. The
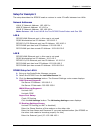
Remote Connection Authentication screen
displays.
Remote Connection Authentication Screen
If you check
PAP, then check Use Local Settings and enter the Remote User
Name
and Remote Password.
Click the
OK button and return to the RouteFinder Manager main menu.
4. On the RouteFinder Manager main menu, click the
Port Settings button to setup
your modem.
Click the
Dialup/Hangup Setting button to enable/disable dial-on-demand.
Click the OK
button to return to the RouteFinder Manager main menu.
5. On the RouteFinder Manager main menu, click the
Routing Settings button.
Add the Default
Gateway as 192.168.100.1 and the Interface as Async Port
6. Click Save and Exit
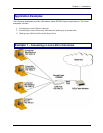
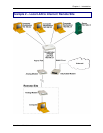
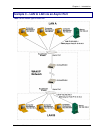
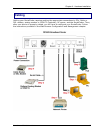
Workstation Setup for LAN B
Set IP Address to 10.10.10.2
Set Default Gateway to 10.10.10.1
Once Setup Is Complete
You can try to ping 10.10.10.1 on the LAN A workstation. This will cause the RF500S on
LAN A to dial and connect to the RF500S on LAN B. Once both modems are connected, you
will see all the ping responses.
You can also bring up the RouteFinder Monitor program to see the activities on the Async
Port.