


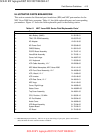

Field Service Guidelines 4-9
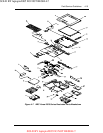
1.
Turn off the computer and remove the Battery, Hard Disk Drive, and Diskette
Drive Modules. Follow all disassembly procedures mentioned from the start of
this section.
2.
Turn the System Unit upside down with the bottom facing up. Remove the nine
screws securing the base unit assembly from the top unit assembly.
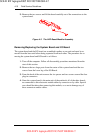
3.
Return the back to the normal position. Remove the screw located between the
hinges above the LEDs. Next remove the screw located just under the speaker on
the left side, the screw just to the right of the LEDs and the screw located to the
right of the LCD cable connector. Lift the top cover from the base cover. Note,
that the LCD, speaker, and the VersaGlide cables are all still attached to the sys-
tem board. Pull these cables out and remove the whole top cover assembly.
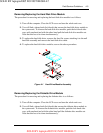
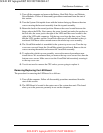
4.
The VersaGlide module is assembled to the system top cover case. Turn the top
cover case over and locate the VersaGlide printed circuit board. Remove the six
screws securing the module and remove the VersaGlide assembly.
5.
To replace the whole top case assembly, reverse the removal procedures men-
tioned above. We recommend that you remove the top cover screws first, then the
bottom cover screws. Make sure to test the VersaGlide before entirely securing it
to the top cover case.
6.
You do not need to remove the CPU unless you are going to replace it.
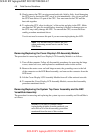
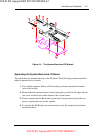
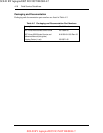
Removing/Replacing the LED Board
The procedure for removing the LED board is as follows:
1.
Turn off the computer. Follow all disassembly procedures mentioned from the
start of this section.
2.
The LED Board is located in the center rear of the system base unit. This board
alerts you to the processes presently in use on the computer.
SOLD BY laptopia2005 DO NOT RESELL!!
SOLD BY laptopia2005 DO NOT RESELL!!