


YML854 Rev1 NB6, NB6W, NB6Plus4, NB6Plus4W, NB6Plus4WnNB6, NB6W, NB6Plus4, NB6Plus4W, NB6Plus4Wn User Guide
www.netcomm.com.au 45
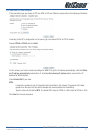
MER
Description:
In this deployment environment, we make up a private IP network of 192.168.1.1. NAT function is enabled to
support multiple clients to access to Internet.
In this example, the ADSL Router acts as a NAT device which translates a private IP address into a public
address. Therefore multiple users can share with one public IP address to access the Internet through this
router. The public address can be a static public address that is pre-assigned by ISP or a dynamic public
address that is assigned by the ISP DHCP server.
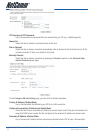
Configuration:
1. Start your browser and type 192.168.1.1 in the URL box to access ADSL web-based manager.
2. Go to Quick Start – Quick Setup. Uncheck Auto Scan Internet Connection (PVC). Key in the VCI and VPI
value, e.g.,
• VPI – 8
• VCI – 35
Then click the Next button.
3. On the Configure Internet Connection – Connection Type page, select Bridging and then click the
Next button.
4. On the WAN IP Settings page, select Obtain an IP address automatically; then, select Obtain DNS
server address automatically.
5. Check Enable NAT. Then click Next.
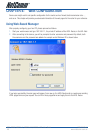
6. On the Configure LAN side Settings page, key in the IP address and subnet mask for your LAN. Check
DHCP Server On box, and enter the start and end points, e.g.:
Primary IP address:192.168.1.1
Subnet Mask:255.255.255.0
Start IP Address:192.168.1.2
End IP Address: 192.168.1.254
Then key in the leased time that you want. And click Next
7. Check the network information on the Summary page. Make sure the contents match the settings
provided by your ISP. Click Finish.
8. Now the router is correctly configured. You can access the Internet.