


57
NN42040-105 Personal Agent User Guide
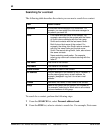
1 On the personal address book page, click the Groups button. The groups
page appears.
2 In the Enter new group name box, type the name of the new group.
3 Click Add.
4 Repeat Step 2 and Step 3 to add more groups.
5 To rename a group, select the group in the Groups window and click
Rename.
6 To delete a group, select the group in the Groups window and click Delete.
7 Click Back to return to your personal address book.
Designating a contact as a Friend
You can use the Personal Agent to create, view, and update your Friends contacts.
Your Friends are contacts that you work with or correspond with regularly. When
you designate contacts as Friends, you can view their online status.
To designate a contact as a Friend, perform the following steps.
1 Select the Friend check box in the contact details page when you enter
contact information in your personal address book (Card view or List view).
2 Click Save.
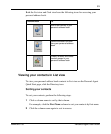
The contact you designated as a Friend now appears in your personal address
book (List view) with the Friends icon appearing in the Friends column for the
selected contact.
In Card view, the contact you designated as a Friend appears with the Friend
icon next to the contact name.
Note: To designate a contact as a Friend in your personal address book,
Presence must be enabled in your service package. Your service package
determines the maximum number of contacts that you can designate as
Friends. By designating a contact as a Friend, you can view their activity
by clicking the Friends Online button in the Multimedia Web Client. For
more information, see Nortel AS 5300 Multimedia PC Client User Guide
(NN42040-107).