


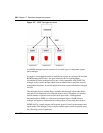

Chapter 17 Remote management screens 343
BCM50a Integrated Router Configuration — Basics
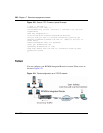
Configuring DNS
Use DNS (Domain Name System) to map a domain name to its corresponding IP
address and vice versa, for example, the IP address of www.nortel.com is
47.249.48.20.
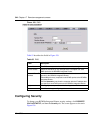
To change your BCM50a Integrated Router DNS settings, click REMOTE
MANAGEMENT, and then the DNS tab. The screen appears as shown in
Figure 129.
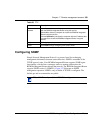
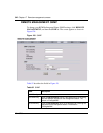
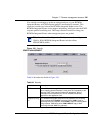
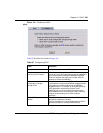
Trusted Host If you enter a trusted host, your BCM50a Integrated Router only
responds to SNMP messages from this address. In the field, 0.0.0.0
(default) means your BCM50a Integrated Router responds to all
SNMP messages it receives, regardless of source.
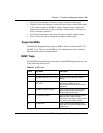
Trap
Community Type the trap community, which is the password sent with each trap
to the SNMP manager. The default is public and allows all requests.
Destination Type the IP address of the station to send your SNMP traps to.
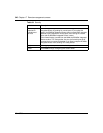
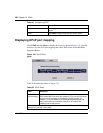
SNMP
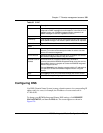
Service Port You change the server port number for a service if needed,
however, you must use the same port number in order to use that
service for remote management.
Service Access Select the interfaces (If any) through which a computer can access
the BCM50a Integrated Router using this service.
Secured Client IP
Address
A secured client is a trusted computer that is allowed to
communicate with the BCM50a Integrated Router using this service.
Select All to allow any computer to access the BCM50a Integrated
Router using this service.
Choose Selected to just allow the computer with the IP address that
you specify to access the BCM50a Integrated Router using this
service.
Apply Click Apply to save your customized settings and exit this screen.
Reset Click Reset to begin configuring this screen afresh.
Table 92 SNMP
Label Description