


CHAPTER 214
COPYING A DOCUMENT
1 Turn on your printer. See "Turning Your Printer On and Off".
2 Make sure that the out of black or colour ink indicators on the front panel are not flashing, or are not
illuminated. If either one is, it is suggested that you replace the corresponding ink cartridge. For more
information see "Replacing the Ink Cartridges".
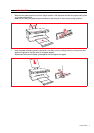
3 Load the paper on which you want to print. For information see "Loading Paper".
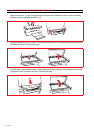
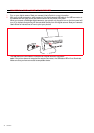
4 Open the top cover and place the document you want to copy face down on the scanner glass. Make
sure the upper left corner of the front of the item aligns with the upper left corner of the scanner glass.
For more information see "Placing Your Document on the Scanner Glass".
5 Close the top cover.
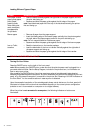
6
Select the print or copy quality, either Normal or Photo, by pressing the Quality button. If you are copying
a normal black/white text or a mixed black/white and colour document, choose Normal. If you are copying
a photo or a document with photos, choose Photo
. For more information see "Printer Front Panel".
7 Select the contrast, either Dark, Light or Normal, by pressing the Contrast button. For more information
see "Printer Front Panel".
8 To make more than one copy, press the plus sign (+) on the Copy selection button the number of times
needed until displaying the number of copies on the copy counter. For more information see "Printer
Front Panel".
9 Press the Black Copy button to create a black and white copy, or press the Colour Copy button to
create a colour copy. For more information see "Printer Front Panel".
note: If you are copying on different paper sizes with respect to the size of the original, press and hold
down the Black Copy or Colour Copy button to activate the Fit-to-Page feature. The printer will
automatically adjust the size of the original document to fit the size of the paper loaded.
PRINTING PHOTOS FROM YOUR PICTBRIDGE DIGITAL CAMERA
note: Before proceeding, make sure that your digital camera is PictBridge-complaint by reading the
camera’s User’s Guide.
1 Load the paper on which you want to print. For optimum results when printing photographs, use
photo paper. For information see "Loading Paper".
note: If the size of the paper loaded in the printer is different than the paper size selected from the
digital camera for printing and you begin to print, the printed output will be wrong.
Only a paper size smaller than the size selected from the digital camera will interrupt the print job and
cause the Print button on the front panel to illuminate. Load the correct paper and press the Print
button to resume printing.
2 Make sure your PictBridge digital camera is turned on and connected to the printer. For more
information, see "Connecting a Digital Camera to Your Printer".
3 Printing is managed directly by your camera, so read your camera’s User’s Guide for instructions on how
to print your photos.
During printing, the Print button will flash to indicate that a print job is under way.