


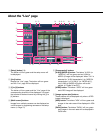


8
u [AUX] buttons (*2)
[AUX] button will become available only when "AUX
output" is selected for "Terminal 3" on the setup
menu. (☞ Page 45)
[Open] button: The letters "Open" will turn green
and the status of AUX connector will be open.
[Close] button: The letters "Close" will turn green
and the status of the AUX connector will be
closed.
i [Rec. on SD] button (*2)
This button will be displayed only when "Manual" is
selected for "Save trigger" on the setup menu.
(☞ Page 31)
Click this button to manually record images on the
SD memory card. Refer to page 12 for descriptions
of how to manually record images on the SD memo-
ry card.
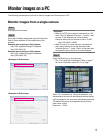
o [Log] button (*1)
[List] button will be displayed only when "On" is
selected for "Save logs" on the setup menu.
(☞ page 33) When this button is clicked, the log list
will be displayed and images saved on the SD
memory card can be played. Refer to pages 17 to
20 for further information about the log list and for
how to play images on the SD memory card.
!0 [Zoom] buttons (*2)
:Clickthisbuttontoadjustthezoomratio
to the WIDE side.
:Clickthisbuttontosetthezoomratioto
x1.
:Clickthisbuttontoadjustthezoomratio
to the TELE side.
!1 [Focus] buttons (*2)
:Clickthisbuttontoadjustthefocusauto-
matically.
:Clickthisbuttontoadjustthefocustothe
"Near" side.
:Clickthisbuttontoadjustthefocustothe
"Far" side.
!2 Auto mode (*2)
Select an operation from the pull-down menu and
click the [Start] button. The selected operation will
start.
Click the [Stop] button to stop the operation.
The selected operation will stop when the camera
(panning/tilting/zooming/focusing)isoperated.
Auto track: Performs auto track when the camera
supports auto track (AUTO TRACK).
Auto pan: Automatically pans between the start
position and the end position set in advance.
Evenwhenthecameraisoperatedforzooming
or focusing, the camera continues panning.
Preset position sequence: Automatically moves to
the preset positions orderly (start from the low-
est preset position number).
Patrol 1-4: Operates the camera in accordance with
patrol function settings.
Note:
•Tocheckifthecamerasupportsautotrack,referto
the operating instructions of the camera.
•Toactivateautopan,sort,presetpositionsequence
or patrol 1-4, it is required to perform the settings
on the setup menu of camera in advance. (☞ Page
41)
•WhileacameracontrolledviatheRS-485communi-
cation interface is executing a patrol function, it is
impossible to start another one. Stop the current
patrol function before starting a new one.
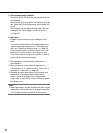
!3 Control pad/buttons (*2)
:Left-clickonthecontrolpadto
adjustthehorizontal/vertical
position of the camera (panning/
tilting).
Panning/tilting speed will be
faster if a clicked point gets far-
ther from the center point of the control pad.
It is also possible to pan/tilt the camera by dragging
the mouse. Zoom and focus can be adjusted by
right-clicking. When an upper/lower area of the con-
trol pad is right-clicked, the displayed image will be
zoomedin/outon.Whenaleft/rightareaisright-
clicked, the focus will be adjusted to the Near/Far
side.