


Introduction 24
SmartNode 4400 Series Getting Started Guide 3 • Hardware installation
Introduction
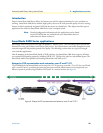
This chapter contains information for planning the installation of the SmartNode 4400 IpChannel Bank with
the following installation procedures:
• Section “Unpacking the Model SN4400 series IpChannel Bank” on page 27 lists the contents of the ship-
ping box
• Section “IpChannel Bank chassis installation” on page 27 describes installing the IpChannel Bank on a flat
surface or in a 19-inch rack
• Section “Connecting cables” on page 28 describes installing the power and port cables
• Section “Connecting power” on page 30 describes how to verify that the IpChannel Bank is ready for con-
figuration
Planning the installation
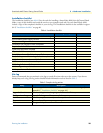
Before beginning the actual installation, we strongly recommend that you gather all the information you will
need to install and set up the device. See table 4 for an example of installment checklist that may be necessary
for a smoother installation. Completing the pre-installation checks enables you to install and set up your
IpChannel Bank within an existing network infrastructure with confidence.
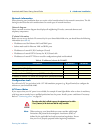
Before installing the IpChannel Bank device, the following tasks should be completed:
• Prepare an installation checklist using the list provided in section “Installation checklist” on page 25
• Initiate and mantain a site log using the information in section “Site log” on page 25 as a guide
• Create a network diagram (see section “Network information” on page 26)
• Gather IP related information (see section “IP related information” on page 26 for more information)
• Install the hardware and software needed to configure the SmartNode. (See section “Configuration tools”
on page 26)
• Verify power source reliability (see section “Power source” on page 27).
When you finish preparing for your VoIP installation, go to section “Installing the IpChannel Bank” on
page 27 to install the device.