


C2681M (2/08) 15
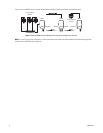
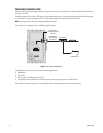
To install the network cable (refer to Figure 6 on page 13):
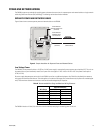
1. Run the network cable from a network switch inside the building to the mount site. The equipment must support Gigabit Ethernet operation.
NOTE: If you use a junction box or patch panel, make sure the connection is protected from the weather.
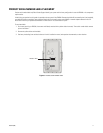
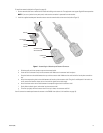
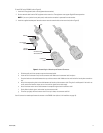
2. Install the supplied weatherproof network connector onto the network cable at the mount site (refer to Figure 7):
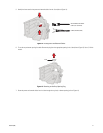
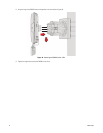
Figure 7. Assembling the Weatherproof Network Connector
a. Slide the small end of the connector cap onto the network cable.
b. Insert the RJ-45 connector firmly into the connector shell. Make sure the connector locks into place.
c. Snap the ferrule onto the cable between the cap and the connector shell. Make sure the small end of the ferrule points toward the
cap.
d. Attach the compression gland to the cable between the ferrule and the connector shell. The gland is multilayered. If the hole is too
small, remove the innermost layers one at a time until the gland fits the cable snugly.
e. Attach the thrust washer to the cable between the compression gland and the connector shell.
f. Gently slide the ferrule, gland, and washer into the connector shell.
g. Twist the cap tightly onto the connector shell. If the cap is loose, the connector could fail.
You will connect the weatherproof network connector to the EW5001 later (refer to Unit Installation on page 19).
CAP
NETWORK CABLE
AND CONNECTOR
CONNECTOR
SHELL
THRUST
WASHER
ADJUSTABLE
SEAL
FERRULE