


Pitney Bowes DA300 Operator Guide 2-7
Setting Up the DA300 Printer • 2
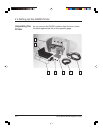
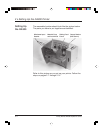
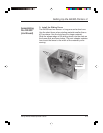
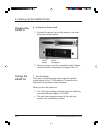
1. Attach the Material Prop
Assembling
the DA300
(continued)
1. The material prop has three grooves on its back
side Place it on the wire frame so the grooves
engage the bars of the frame and the hole for the
lock knob is facing up.
2. Place the small washer on the lock knob.
3. Push the threaded portion of the lock knob through
the hole in the material prop.
4. Position the plastic clamp and nut plate on the
other side of the material prop and turn the lock
knob clockwise until the prop is secure.
The position of the material prop will change, de-
pending on the material you run. You'll find out how
to adjust it in the next chapter.
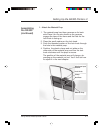
Wireframe Input
Stacker
Lock Knob
Clamp
Nut Plate
Material Prop