


E – 17
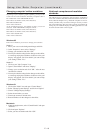
AC IN
POWER
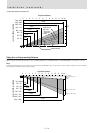
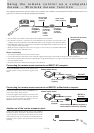
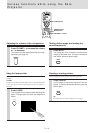
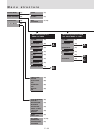
Using the adjusters to adjust the height balance
There are two front adjusters and a rear adjuster.
To lower the position of the screen, pull out the folded leg of the
rear adjuster.
For the front adjusters, rotate each adjuster until the unit is
vertically parallel to the screen.
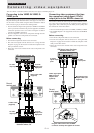
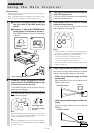
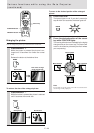
6 Adjust the image size with the zoom ring
lever, then adjust the focus with the focus
ring.
7 Change the unit setting to suit to the
projecting method and selected source
as described in step 4.
• Select the type of projection
If the projected image is horizontally reversed
or upside down, change the projection type.
See page 24.
• If the component video signal output
jacks of the video component are con-
nected to the RGB IN connector (see
page 11), set “INPUT MODE” to “YCbCr”
in the menu.
This setting provides a better picture image.
See page 24.
• Adjust the projected image from the
source connected to the RGB IN con-
nector.
The resolutions most suitable to the incoming
signals will automatically be selected. How-
ever, if any vertical banding, noise, dot interfer-
ence, or crosstalk appears on the screen, ad-
just “PICTURE ADJ,” then “FINE PICTURE”
using the menus. You can also adjust the hori-
zontal and vertical position of the image. See
pages 25 to 27.
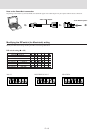
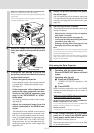
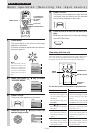
Up Down
POWER
STATUS
MENU
ADJUST
ENTER
SELECT
DLP
Focus ring
Zoom ring lever
8 Adjust the picture elements and select
the picture type.
You can adjust the picture elements (see page
27), select the picture type according to the video
contents (see page 28) and wide screen (see
page 28).
9 Start using the Data Projector.
The following functions are available while using
the Data Projector:
• Adjusting the volume of the unit speaker
(see pages 19 and 24),
• Using the laser pointer (see page 19),
• Turning off the image and muting the sound
temporarily (see page 19),
• Freezing a moving picture (see page 19), and
• Enlarging the picture (see page 20).
Note
If “POWER OFF” is set to “ON” (see page 28), the image will
be turned off if the unit has been left unoperated for five
minutes with an RGB input source.
If the image is suddenly turned off while projecting a computer
image, the computer’s screen saver or the unit’s POWER OFF
function may be activated.
After using the Data Projector
1 • Operating with the remote control
Press the POWER OFF button a little bit
longer.
• Operating with the unit
1 Press the POWER button.
“POWER OFF/ENTER” appears on the
screen.
2 Press ENTER.
When you have turned off the unit, the POWER
indicator will start blinking then turn to amber in
one minute.
Never turn off the POWER switch (main power)
while the POWER indicator is blinking.
To cancel turning off the unit when “POWER OFF/
ENTER” is appearing on the screen
See “Canceling turning off the unit when ‘POWER OFF/
ENTER’ is appearing on the screen” on page 29.
Please also read
“Activating the on-screen function” on page 29.
2 If the POWER indicator is lit in amber,
press the “O” side of the POWER switch
(main power) on the back of the unit.
The POWER indicator goes out.
Disconnect the power cord if it is not to be used
for an extended period.
Pull out