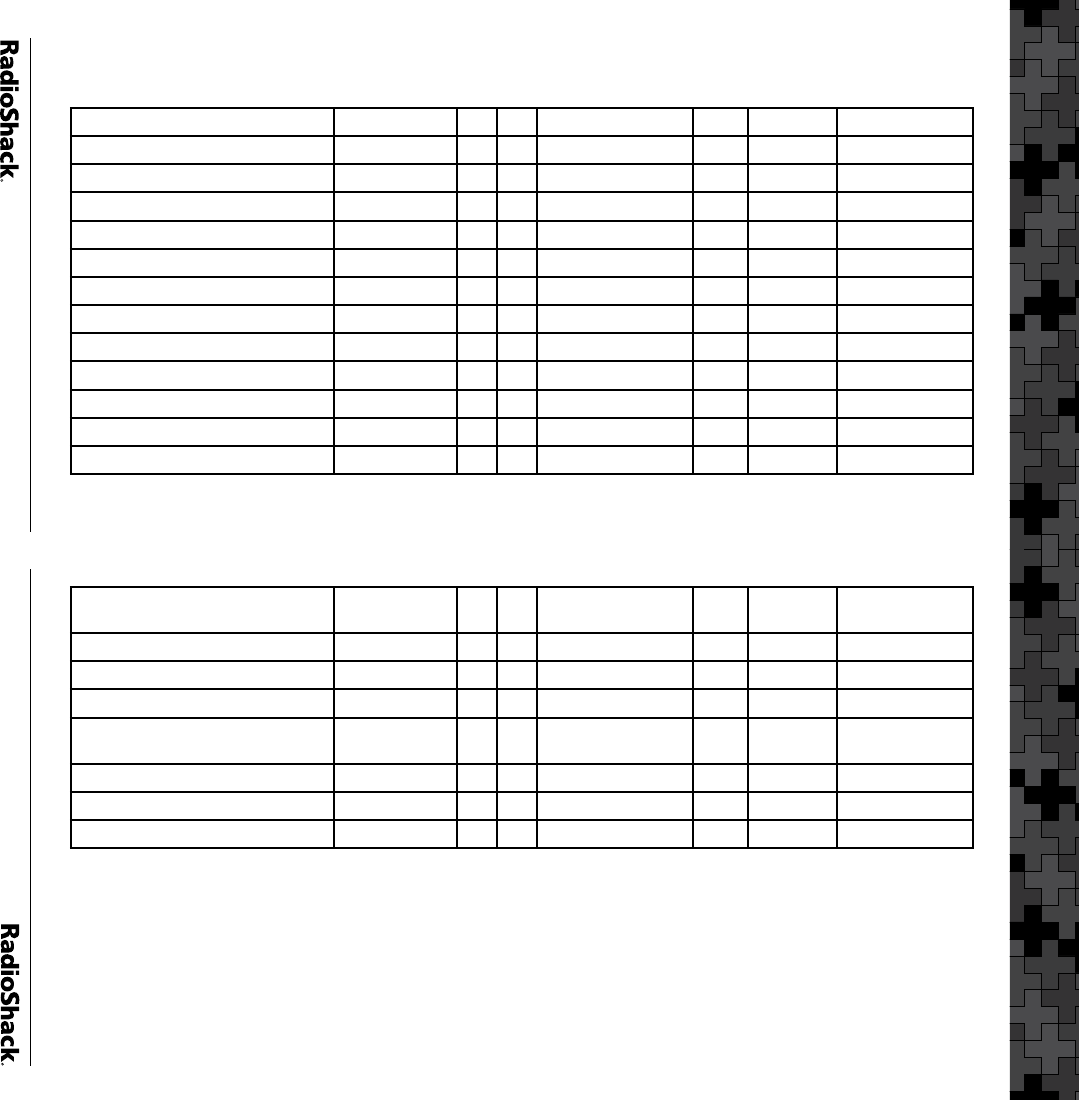
26
VS 7 – WA, OR, NV and UT
RR System Name VS Name VS SL System Name State User Type System Type
Clark Co. WA-OR-NV-UT 7 1 ClarkCounty NV County Motorola
Washoe Co. WA-OR-NV-UT 7 2 WashoeChimPk NV County Net EDACS W 1
Washoe Co. WA-OR-NV-UT 7 3 WashoeCrystal NV County Net EDACS W 1
Washoe Co. WA-OR-NV-UT 7 4 WashoeEagle NV County Net EDACS W 1
Washoe Co. WA-OR-NV-UT 7 5 WashoeFoxMt NV County Net EDACS W 1
Washoe Co. WA-OR-NV-UT 7 6 WashoeMarble NV County Net EDACS W 1
Washoe Co. WA-OR-NV-UT 7 7 WashoePatrick NV County Net EDACS W 1
Washoe Co. WA-OR-NV-UT 7 8 WashoePeavine NV County Net EDACS W 1
Washoe Co. WA-OR-NV-UT 7 9 WashoePoito NV County Net EDACS W 1
Washoe Co. WA-OR-NV-UT 7 10 WashoeSimul NV County Net EDACS W 1
Washoe Co. WA-OR-NV-UT 7 11 WashoeSlide NV County Net EDACS W 1
Washoe Co. WA-OR-NV-UT 7 12 WashoeVirginiaPk NV County Net EDACS W 1
VS 7 – WA, OR, NV and UT
Portland Bureau of Emergency
Communications (BOEC)
WA-OR-NV-UT 7 13 PortlandBOEC OR Regional Motorola
Washington Co./Clackamas Co. WA-OR-NV-UT 7 14 WashngtnClakamas OR Regional Motorola
Salt Lake City Public Safety (AC33) WA-OR-NV-UT 7 15 SaltLakeCity UT City Motorola
Salt Lake Co. Public Safety WA-OR-NV-UT 7 16 SaltLakeCounty UT County Motorola
Clark Regional Emergency
Services Agency
WA-OR-NV-UT 7 17 CRESA WA Regional Motorola
Seattle-King Co. Public Safety WA-OR-NV-UT 7 18 Seattle-King WA Regional Motorola
Snohomish Co. WA-OR-NV-UT 7 19 Snohomish WA County Motorola
Tacoma Public Safety WA-OR-NV-UT 7 20 Tacoma WA City Motorola