


CHAPTER 2: INSTALLATION 9
Initial Configuration
Assign an IP Address
1. Power ON Dominion KX via the power switch on the back of the unit.
2. Wait approximately 30 seconds as Dominion KX boots.
3. After it boots, a login prompt will appear on the monitor attached to Dominion KX’s Local Access
Console. Log on with the default username/password of admin/raritan.
4. Press the <F5> key to activate the Administrative Menu.
5. Select Option 3, Network Settings, and press the <ENTER> key.
6. Specify TCP/IP parameters for your Dominion KX unit: IP address, subnet mask, and default gateway.
When finished, press the <S> key to save the settings, and then press <ESC> to exit the menu.
7. Press <ESC> again to log out. Power cycle your Dominion KX unit to enable the new network
settings.
8. Connect one end of a straight-through Ethernet cable (included) to the port labeled LAN1 on the rear
panel of Dominion KX, and the other end to a network switch or router.
9. Reboot Dominion KX by switching the power OFF, then ON, in order to apply the new network
settings.
Your Dominion KX unit is now network accessible.
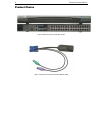
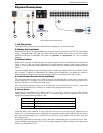
Connect and Name Target Servers
1. Connect one end of a standard, straight-through UTP cable (Cat5/5e/6) to an unoccupied server port;
connect the other end to the RJ45 port on a Dominion KX Computer Interface Module (CIM): DCIM-
PS2 (PS/2 ports); DCIM-USB (USB ports); DCIM-SUSB (USB ports for Sun servers); or DCIM-SUN
(Sun ports with HD15 video).
2. Connect the remaining ports on the CIM to the corresponding KVM ports of the server that you wish
to manage using Dominion KX.
3. Repeat steps 1 and 2 to connect all servers that you wish to manage using Dominion KX.
4. On the Local Access Console, log on with the default username/password of admin/raritan.
5. Press the <F5> key to activate the Administrative Menu, and select Option 5, Channel Configuration.
6. Select a server port to rename, and press the <ENTER> key. When the cursor changes to a green
color, assign a name (up to 20 characters) to identify the server connected to that port. Press
<ENTER> to complete the change.
7. Press the <S> key to save your changes and then press <ESC> to exit the menu.
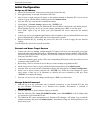
Change Default Password
1. Find and log on to any workstation with (a) network connectivity to your Dominion KX unit, and
(b) Java Runtime Environment v1.4.x installed (Java Runtime Environment is available at
http://java.sun.com/).
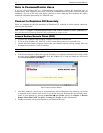
2. Launch a web browser such as Internet Explorer or Mozilla.
3. Enter the following URL: http://IP-ADDRESS/admin, where IP-ADDRESS is the IP address that
you assigned to your Dominion KX unit.
4. The Dominion KX remote management tool, Dominion KX Manager, will launch. Log on with the
standard username and password (admin/raritan). Immediately change the default password to one
known only to you.