


CHAPTER 2: INSTALLATION 5
Chapter 2: Installation
Important! The Paragon and all devices you want to attach to it must be unplugged and powered
OFF prior to installation.
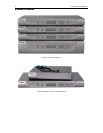
Basic Installation
1. Connect power cord to the Main Switching Unit.
Optional Stacking Support:
− Connect power cord to a Stacking Unit.
− Connect one end of a stacking cable to the "Expansion Port Out" on the back of the Stacking Unit.
Connect the other end of the cable to the "Expansion Port" on the Main Switching Unit
− Power ON all switching units
− On the front panel LCD of the Main Switching Unit:
Press the [FUNC] button and use the [] and [] keys to select "Stacking Support." Press
the [ENT] button.
Select the total number of Stacking Units desired (0-3). Press the [ENT] button.
− On the front panel LCD of the Stacking Unit:
Press the [FUNC] button and use the [] and [] keys to select "Set Stack ID." Press the
[ENT] button.
Assign the Stacking Unit ID using the [] and [] keys. Each Stacking Unit MUST HAVE
A UNIQUE ID (1-3)
− Press the [ENT] button (sequential order is not necessary).
2. Power ON the Main Switching Unit.
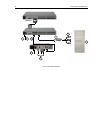
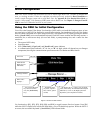
3. Connect one end of a Category 5e UTP cable to User Port #1 on the back of the Main Switching Unit.
Connect the other end of the cable to the “Cat5 Port” on the back of the User Station (P2-UST)
4. Connect a power cord to the User Station. Power ON the User Station.
5. Connect a PS/2 keyboard, mouse, and VGA monitor to the User Station. Power ON the monitor.
6. Connect one end of a Category 5e UTP cable to Channel Port #1 on the back of the Main Switching
Unit (or Stacking Unit, if attached). Connect the other end of the cable to the RJ45 port on a Computer
Interface Module (P2-CIM).
7. Connect the P2-CIM to server’s keyboard, video, and mouse ports.
8. Power ON server.
Repeat steps 3 through 8 for all other CPUs you want to attach.