


CHAPTER 5: PARAGON II AND Z-CIM 47
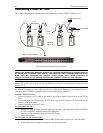
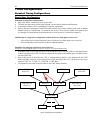
c. Place the Z-CIM Terminator in the Z-CIM’s UTP IN port.
d. Power ON computer.
e. Optional: Connect a local user console to the UKVMSC Z-CIM.
Perform Channel Configuration:
1. At a User Station Login Menu, type admin in the User Name field and press [Enter].
2. Type “raritan” (all lowercase) in the Password field and press [Enter].
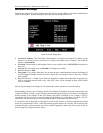
3. Press [F5] to go the Administration Menu and select the Channel Configuration submenu.
4. Use the [] and [] or the [Page Up] and [Page Down] keys to highlight the Paragon II channel
where the Z-CIM was just added.
5. Ensure that the Device field reads Zseries.
6. If Zseries does not appear in the Device field:
a. Press [Tab] until the Device field is active, them press [Enter] - the highlight will turn green.
b. Use the [] and [] keys to change device type to Z-Series and press [Enter] - the green
highlight will return to yellow.
c. Press [S] to save the change, or press [Esc] to exit without saving.
7. If a more descriptive name is desired:
a. Hold the [Shift] key and press [Tab] to go back to the Name column, then press [Enter] - the
highlight will turn blue.
b. Edit the default name and press [Enter] - the highlight will turn green as you begin to type.
c. Press [S] to save the change, or press [Esc] to exit without saving.
8. Press [F2] to go to the Selection Menu to validate that the second-tier Z-CIM is properly configured.
Select the tiered Z-CIM device and press [Enter].
Name the Computer Channel on the Z-CIM tiered Selection Menu:
1. When viewing the Paragon II Selection Menu or any OSUI menu, press [F5] to go to the
Administration Menu.
2. Select the Channel Configuration submenu.
3. Select the Z-CIM device channel.
4. Press [G] to bring up a Channel Configuration menu for the Z-CIM chain.
5. Use the [] and [] keys to highlight the Name field of the computer just connected via Z-CIM. The
channel for this computer is displayed in green, and the highlight will turn yellow when it is selected.
6. Press [Enter] - the highlight will turn blue.
7. Type the desired computer name - the highlight will turn green as you begin to type.
8. Press [Enter] - the highlight will turn yellow.
9. Press [S] to save the new name.
Verify and Save Changes:
1. Press [F2] to return to the Selection Menu.
2. The Selection Menu will display with the new computer name highlighted in white.
3. Press [Enter] to switch to this selected computer.
4. Normal computer access and operation indicates a successful connection.
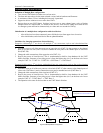
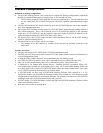
Note: Repeat the steps on the previous pages:
Connect Z-CIMs as a Tier
Perform Channel Configuration
Name the Computer Channel on the Z-CIM tiered Selection Menu
Verify and Save Changes
for each server to be added to the chain. Name and test each computer as it is added. Follow the steps
below to build the rest of the Z-CIM chain of servers.