


Location and Function of Controls
2-2
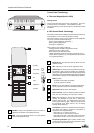
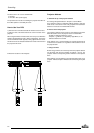
b. RCU Control Panel Terminology
This remote control includes a battery powered infrared (IR) transmit-
ter that allows the user to control the projector remotely.
This remote control is used for source selection, control, adaptation
and set-up. It includes automatic storing of :
- picture controls (Brightness, Sharpness…)
- picture geometry adjustments
- convergence adjustments
Other functions of the remote control are:
- switching between standby and operational modes
- switching to "pause" (picture mute)
- direct access to all connected sources
- variable adjustment speed: when pushing continuously on the
control stick or the picture keys, the adjustment will be executed
in an accelerated fashion.
standby
sharpness
pause/park
tint
color
brightness
contrast
Backlight Key: when activated, all keys will be lit up and
visible in the dark.
ADJ.: adjust key, to enter or exit the adjustment mode.
Address Key (recessed): to enter the address of the projec-
tor (between 0 and 9). Press the address key, followed by
pressing one digit button between 0 and 9. When programmed
with address 0, the remote will talk to all projectors regardless
of their address. See page 4-2 on Setting Projector Address.
STBY (standby):
- to initiate remote power up operation
- to put the projector in standby
Pause: to mute, press PAUSE. The image will disappear
but full power will be retained for immediate restarting.
Digit Buttons: direct aspect ratio selection.
Picture Controls: use these buttons to obtain the desired
level (see also 'Controlling') for each picture function.
TEXT: when adjusting one of the image controls during a
meeting, the displayed bar scale can be removed by
pressing 'TEXT' key first. To re-display the bar scale on the
screen, press 'TEXT' key again. 'TEXT' key is only active in
the operational mode. When 'TEXT' is off, no warning
message will be displayed.
1
2
3
Control Disk: to make menu selections when in the adjust-
ment mode. Also allows to increment or decrement an
adjustment in the adjustment mode.
control disk up = up arrow in the menus
control disk down = down arrow in the menus
control disk to the right = arrow to the right on the menus
control disk to the left = arrow to the left on the menus
RC Operating Indication: lights up when a button on the
remote control is pressed. (This is a visual indicator to check
the operation of the remote control)
ENTER: to start up the adjustment mode or to confirm an
adjustment or selection in the adjustment mode.
EXIT: to leave the adjustment mode or to scroll upwards
when in the adjustment mode.
9
10
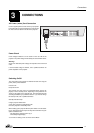
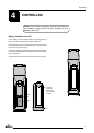
Control Panel Terminology
a. The Local Keypad (built in RCU)
Gaining Access
The local keypad is built in into the rear of the projector. Push once
on the door cover and it will open. It is possible to turn it 90°.
This local keyboard has the same functions as the Remote Control
Unit (RCU).
4
5
6
7
8
11
12
▼
▼
▼
▼
STBY
EXIT
ENTER
FREEZ
II
TEXT
PAUSE
ADJ
▼
9
7
5
3
1 2
4
6
8
0
SHARPNESS
–
+
TINT
–
+
.
..
COLOR
–
+
BRIGHTNESS
–
+
CONTRAST
–
+
1
2
3
4
5
6
11
12
10
9
8
7
.
.
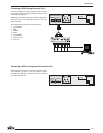
PORT 6
REMOTE
COMMUNICATION
PORT 3
PORT 4/5
(
RGB + HV)
Comp/H sync V sync
. .
. .
.
RG
B