INTERFACE SPECIFICATIONS
SETTING THE DIP SWITCHES
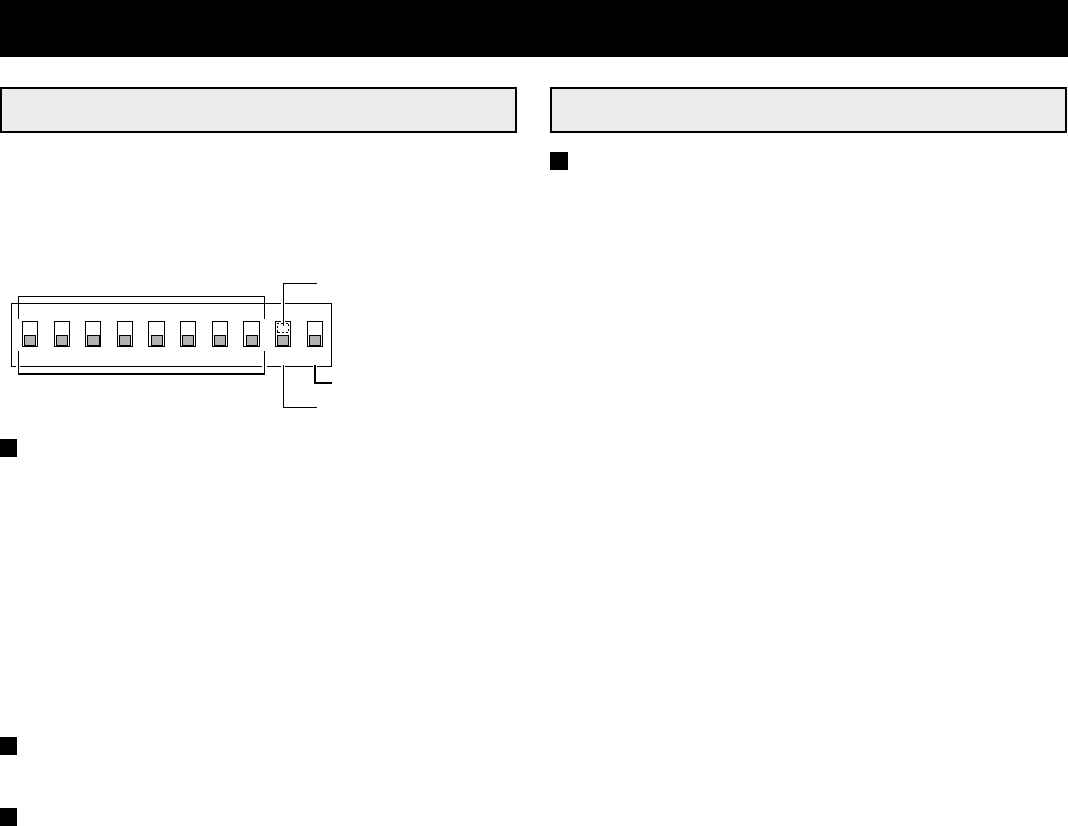
The DIP switches need to be set when a computer, special
controller, etc. connected to the RS-232C or RS-485 connectors
is used to control the multiplexer. Make sure to turn the
multiplexer power off before setting the DIP switches.
SW No.
1-7: To setup the multiplexer address (only when using the
RS-485 connector).
Switch 1 is the least significant bit (LSB) and switch 7 the
most significant bit (MSB) (Down: 0, Up: 1)
8: Open (not used)
9: To select the connector used. [232] side (down) for
RS-232C, [485] side (up) for RS-485.
10: To setup the termination (only when using the RS-485
connector).
OFF side (down): Not terminated
ON side (up): Terminated
RS-232C exclusive use
1. Set the DIP switch 9 down ([232] position).
RS-485 exclusive use
1. Set the address using DIP switches 1 to 7.
Example:
•
If the address is 1, set switch 1 to the ON side (up)
•
If the address is 10, set switches 2 and 4 to the ON side
(up)
•
If the address is 127, set all the switches to the ON side
(up)
2. Set the DIP switch 9 up ([485] position).
3. Set the terminator using DIP switch 10
COMMANDS
COMMANDS AVAILABLE FROM THE
COMPUTER
1-16 (90-9F)
To select the picture from a camera to be displayed full screen
on monitor 1.
MULTI (82)
To display a 16 or 9 divisions split screen on monitor 1.
QUAD (83)
To display a 4 divisions split screen on monitor 1.
PLUS (84)
To display a 13 or 6 divisions split screen on monitor 1.
SEQUENCE (87)
To switch the display mode from full screen to sequential display
on monitor 1.
ZOOM (85)
To zoom in the picture on monitor 1.
STILL (86)
To freeze the picture on monitor 1.
LIVE (80)
To select the live input mode.
VCR (81)
To select the VCR playback input mode.
MON2 (88)
To set the output at monitor 2, it can be used in combination with
the monitor 1 display.
MENU (74)
To display the menu on monitor 1.
+ (65), – (66)
To select settings (ON/OFF, numbers, letters, symbols) in the
menus.
j (54), l (64), c (63), d (53)
To change selection in the menus. (To move the cursor
up/down, right/left.)
NEXT (75)
To select the sub-menu in (SENSOR SET) and (DISPLAY SET)
menus.
EXIT (76)
To go to the next menu, or to exit the menu mode.
MENU RESET (E1)
To reset all the values of the displayed menu to the default
values.
CLOCK ADJUST (E0)
To reset the clock minutes and seconds setting to 00:00.
SECURITY LOCK ON (69)
To set the security lock.
SECURITY LOCK OFF (6A)
To cancel the security lock.
12345678910
ON
ON
OFF
(ADDRESS SET)
RS232C
TERMINATER ON/OFF
ON
OFF
RS485
L8FC5/US (MPX-CD162, MD162 GB) 2000. 8. 31
English 49


