


20
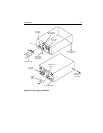
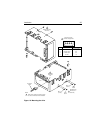
Installing the power supply
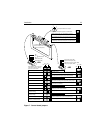
A power supply and AC power cord are available if desired. The power supply
is configured before shipment to operate in one of two AC input voltage ranges.
The voltage select plate on the power supply (see Figure 8) indicates the factory-
preset voltage range. You may change the voltage range by setting the voltage
select switch to the desired range.
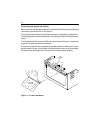
Setting the voltage range
Caution. The power supply will be damaged if the voltage select is set for the
low range (100–120 VAC) and a voltage in the high range (208–240
VAC) is applied.
1. Ensure that the AC power cable is disconnected from the power supply.
2. To change the voltage range, perform the following steps:
a. Remove the screw that secures the voltage select plate to the power
supply and remove the plate from the power supply. Retain the plate and
all hardware.
b. Set the voltage select switch to the desired range.
c. Reverse the voltage select plate and install the plate on the power supply
to lock the switch in the desired range.
d. Replace the existing AC power cable with the AC power cable specified
for the new operating voltage. Refer to section 4 for information about
ordering a replacement AC power cord.
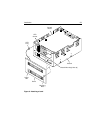
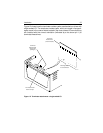
Mounting the power supply
Note. The mounting screw threads must be completely engaged in the power
supply chassis but must not exceed the limits given in the next step.
1. Select mounting screws that meet the following criteria for insertion depth:
• For bottom mounting—2.8 to 6.4 mm (0.110 to 0.250 in)
• For side mounting—5.0 mm (0.2 in) maximum
2. Mount the power supply in the desired location with four 6-32 screws. Use
the tapped mounting holes in the bottom of the power supply or in the sides
of the power supply.
3. Connect a ground strap between the chassis safety ground screw on the
power supply and the cabinet ground.
4. Attach the AC power cord to the power supply connector J1. Do not connect
the power cord to site power until directed.