


- 17 -
2
2
USING THE NETWORK
SCANNER FUNCTION
This section explains the procedure for scanning from the machine after the network scanner settings have been
configured in the Web page.
For the operation panel and the parts of the machine that are used for network scanning, see the operation manual
for the machine.
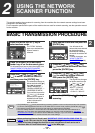
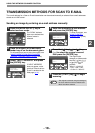
BASIC TRANSMISSION PROCEDURE
1
Press the [MODE SELECT] key to
select scanner mode.
The "SCAN" indicator
lights up to indicate that
scanner mode is
selected.
2
Place the original in the document
feeder tray or on the document glass.
For information on how to place the original, see
"IMAGE ORIENTATION AND STANDARD
ORIGINAL LOADING ORIENTATION" (p.20).
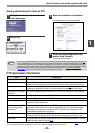
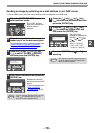
3
Press the [ ] key ( ) or [ ] key
( ) to select "ADDRESS SEARCH"
and then press the [ENTER] key.
The selections change as
follows each time the [ ]
key ( ) is pressed:
"INPUT ADDRESS" →
"GLOBAL ADDRESS" →
"ADDRESS SEARCH".
If you continue to press the
[ ] key ( ), the stored
destinations will appear in
alphabetical order based
on the initial stored for
each destination.
4
Enter search characters and press the
[ENTER] key.
You will search the
names that were entered
for the destinations.
Destinations matching
the search characters will
appear.
To enter characters, see
"HOW TO ENTER
CHARACTERS" (p.20).
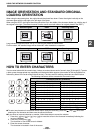
5
Press the [ ] key ( ) or [ ] key
( ) to select the destination and then
press the [ENTER] key.
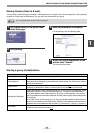
6
Press the [ ] key ( ) or [ ] key
( ) to select the original size and
then press the [ENTER] key.
The original size changes
as follows each time the
[ ] key ( ) or [ ]
key ( ) is pressed:
"8.5x11"→"8.5x5.5"
→"A4"→"B5"→"A5"
→"8.5x14"→"8.5x13".
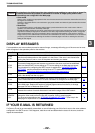
7
Press the [START] key ( ) to begin
scanning.
SCAN USING:
ADDRESS SEARCH
ADDRESS SEARCH
S
ORIG. SIZE ENTER
8.5X11
•
The [CLEAR] key ( ) can be pressed during a scanning operation to return to the previous step of the operation.
To cancel a scanning operation and return to the initial state of scanner mode, press the [CLEAR ALL] key ( ).
•
The network scanner function cannot scan both sides of an original placed in the RSPF.
• The scan settings stored in a scan mode cannot be edited if the scan mode has been selected for a
destination. You can either store the desired settings in a new scan mode as explained in "STORING
SCANNING SETTINGS" (p.7) and then edit the destination settings, or you can cancel the selection of the
scan mode for the destination and then edit the scan mode settings.
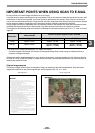
• Before performing Scan to E-mail, read "IMPORTANT POINTS WHEN USING SCAN TO
E-MAIL" (p.23). Take care that the image file is not too large.
• A limit for the size of image files that can be sent using Scan to E-mail can be set in
"Maximum Size of E-mail Attachments" (p.14
) of the Web page.
Note
Caution