


Chapter 5 Control From Editing
Control Units
5-2 Chapter 5 Control From Editing Control Units
Preparations
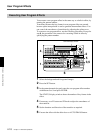
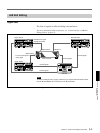
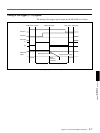
Make the following preparations to control the DFS-700/700P from the
PVE-500.
On the DFS-700/700P
• In page 1 of the setup menu, set F3(PORTS) to “PVE-500”.
• To accept 9-pin serial control signals, press the EDITOR button on the
control panel, turning it on. To accept GPI signals, press the GPI button,
turning it on.
(When the DFS-700/700P is powered on, it accepts either 9-pin serial
control signals or GPI signals.)
On the recorder VCR
• Set the recorder VCR so that it enters PB (playback) mode when stopped.
(If the VCR has a selector for PB or PB/EE, set it to PB.)
• If the VCR has a built-in TBC, set the VCR to DELAYED SYNC mode.
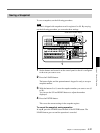
On the PVE-500
Using the setup menu, make the following settings.
For more information about using the setup menu, refer to the PVE-500
Operating Instructions.
• Set the switcher type (menu item SEtUP-20) to 500. (The factory default
setting is 500.)
• If you want to use the automatic snapshot function, set snapshot control
(menu item SEtUP-21) to On. (The factory default setting is OFF.)
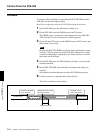
Cut Editing
To perform a cut edit by controlling the DFS-700/700P from the PVE-500,
use the following procedure.
For this operation, refer also to the PVE-500 Operating Instructions.
1 Press the A/B button on the PVE-500 turning it off.
2 Select the player VCR as the FROM source.
3 Set the IN and OUT points for the FROM source and recorder, in any
order.
4 Conduct a preview as required, and execute the edit.
Control From the PVE-500