


Chapter 3 Basic Operation
Chapter 3 Basic Operation 3-47
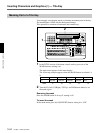
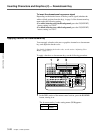
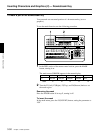
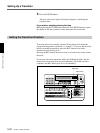
3 Select the downstream key fill signal.
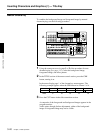
1) Press the PAGE button, and switch to page 1 of the downstream
key menu.
DSK
1/2
Clip
0-100
Gain
0-100
INVERT
OFF
Densty
0-100
FILL
VIDEO
PAGE F1 F2 F3 F4 F5
2) Press the F4(FILL) button, to select the signal used as the key fill
signal.
VIDEO: Use the signal specified as “DSK FILL” in the delegation
section. When you select this, press the DSK FILL button in the
delegation section, turning it on, then select the desired bus with
the AUXILIARY buttons.
DSKMAT: Use an internal DSK matte signal.
NONE: Do not use a key fill signal (applying the border only).
Note
When you select “NONE”, DSK border automatically goes on. If you
now forcibly turn the DSK border off, the downstream key will not
appear.
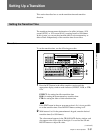
4 Set the downstream key transition time (the time taken to insert the
key).
For an instantaneous insert, set the transition time to zero.
For details of the setting, see the section “Setting the Transition Time” (page
3-51).
5 Press the DSK button to insert the downstream key.
When the downstream key has been inserted, the DSK button lights
red.
During the transition, the DSK button lights amber.
Note
Downstream keys are always delayed by 6H.
Deleting the downstream key
When the DSK button is lit red, press it, turning it off.
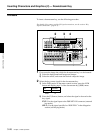
Adjusting the outline of the downstream key
If the outline of the inserted text or graphics is not sharp, in page 1 of the
downstream key menu, adjust the F1(Clip) and F2(Gain) knobs as follows.
• To adjust the degree to which the key is cut out, turn the F1(Clip) knob
to adjust the clip level.
• To adjust the sharpness of outline of the key, turn the F2(Gain) knob to
adjust the key gain.