


16
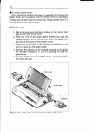
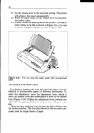
6. Align a sheet of paper on the guide along the adjuster.
7. Turn on the power switch. (The Paper Empty indicator
will glow because there is no paper.)
8. Now set the release lever to the auto-feed setting-the
top position. The printer will advance the paper
automatically.
9. When the paper stops, set the release lever for single
sheets again.
To align paper that is not in straight-
. Set the release lever to the adjustment setting.
l Straighten the paper and adjust it for the margins you
want.
l Move the release lever back to its original setting.
Remember, you can also use the optional automatic sheet
feeder for single sheets.
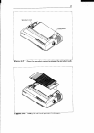
n Loading sprocket-feed paper
This is the familiar computer paper, with the holes along the
sides and perforations between the sheets. It is also called
sprocket, punched, fan-fold, or just plain “computer paper.” It
can be as narrow as 4”, and up to 15.5” wide.
1. Turn on the printer and set the release lever for sprocket-
feed paper.
2. If the paper guide is installed, remove it.
3. Place a stack of fan-fold paper behind the printer.
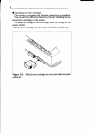
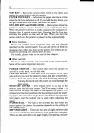
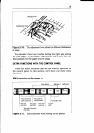
4. Open the sprocket covers, on the right and left sprocket
units, as shown in Figure 2-7.
5. Flip the clamp levers backward. This allows the two
sprocket units to move freely right and left so you can
align them with the holes in the paper.
6. Feed the end of the paper into the slot next to the platen
cover plate.
7. Fit the holes in the paper over the sprocket pins so the
paper is even, and clamp the sprocket units in place.
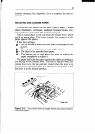
8. Check that the paper is still positioned correctly, and
close the sprocket covers (Figure 2-8).
9. The Paper Empty indicator should be glown. Turn the
platen knob to feed the paper until the indicator goes out.
10. Now turn the platen knob the other way just a bit, until
the indicator glows again.