


SVx41HDI Series Server Remote Control: Instruction Guide
52
Baud (bps): This is the communication speed for the device, and the setting here must
match the setting on the device itself (see below). All common baud rates between 300
and 115,200 bps are supported.
Mode: Sets the character framing scheme that the SVx41HDI will use with the R-Port
device. You can choose from the following selections:
8N1: Eight bits, no parity, one stop bit (default and most common)
7N1/701/7E1/7M1/7S1: Seven bits, (none/odd/even/mark/space) parity, one stop
bit
8N1/801/8E1/8M1/8S1: Eight bits, (none/odd/even/mark/space) parity, one stop
bit
8N2: Eight bits, no parity, two stop bits
Force DCD: Forces the Carrier Detect signal to be active at all times. Normally, DCD
becomes active when a new user connects and is dropped when the last user disconnects
(a response that is similar to many modems). When active, the device will logout and
reset itself if the carrier signal is lost, increasing security. Note that this may not work
with all devices and could impair proper operation in some circumstances. The default
setting is off.
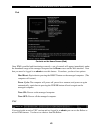
Console Log: Clicking this link will open a separate Web page that will display the last
200 characters committed to that device’s console log. Note that existing data is
overwritten automatically when the 200 character limit is reached.
(Optional, not shown) IPMI: This is an optional feature that requires the purchase of a
software upgrade on the SVx41HDI. Refer to Appendix D for more information about
purchasing and using the IPMI upgrade. This feature will not appear on the menu if the
upgrade is not installed.
You can make as many changes a needed on this menu at one time before applying your
changes. Once you are satisfied with the changes you have made, click Commit changes to
apply the new settings. Click Refresh at any time to see an updated list of attached R-Port
devices.
Advanced Configuration Using the Integrated SSH Shell
In most cases, configuring the SVx41HDI to the same settings as the R-Port devices you are
connecting should allow the devices to work with a minimum amount of configuration.
However, you can also change the default settings on each R-Port device to fit your preferences
and the needs of your application.
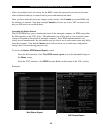
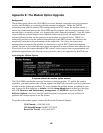
If you click the Connect… button next to the device you want to configure, two new windows
will appear. The smaller of the two is a login screen; the other is a SSH terminal window. Click
the login window and sign in as admin (using the same password as the Web interface) to
activate the terminal window. You will see a welcome banner similar to the following: