


2 Installation
2.4.4 Unattended installation
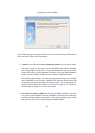
To perform a non-interactive installation of VirtualBox we have provided a response
file named autoresponse that the installer will use for responses to inputs rather
than ask them from you.
Extract the tar.gz package as described in the normal installation. Then open a root
terminal session and execute:
pkgadd -d VirtualBox-3.0.0-SunOS-x86 -n -a autoresponse SUNWvbox
To perform a non-interactive uninstallation, open a root terminal session and exe-
cute:
pkgrm -n -a /opt/VirtualBox/autoresponse SUNWvbox
2.4.5 Configuring a zone for running VirtualBox
Starting with VirtualBox 1.6 it is possible to run VirtualBox from within Solaris
zones. For an introduction of Solaris zones, please refer to http://www.sun.com/
bigadmin/features/articles/solaris_zones.jsp.
Assuming that VirtualBox has already been installed into your zone, you need to give
the zone access to VirtualBox’s device node. This is done by performing the following
steps. Start a root terminal and execute:
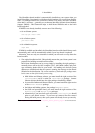
zonecfg -z vboxzone
Inside the zonecfg prompt add the device resource and match properties to the
zone. Here’s how it can be done:
zonecfg:vboxzone>add device
zonecfg:vboxzone:device>set match=/dev/vboxdrv
zonecfg:vboxzone:device>end
zonecfg:vboxzone>verify
zonecfg:vboxzone>exit
If you are running VirtualBox 2.2.0 or above on OpenSolaris or Nevada hosts, you
should add a device for /dev/vboxusbmon too, similar to what was shown above.
This does not apply to Solaris 10 hosts due to lack of USB support.
Replace “vboxzone” with the name of the zone in which you intend to run
VirtualBox. Next reboot the zone using zoneadm and you should be able to run
VirtualBox from within the configured zone.
30