Chapter 1 System Setup 1-17
1.4.7 Verifying Operation of the Slide-Rails and CMA
Use this procedure to ensure that the slide-rails and CMA are operating correctly.
Note – This procedure can be performed more easily by two people: one to move
the server in and out of the rack, and one to observe the cables and CMA.
1. Slowly pull the server out of the rack until the slide-rails reach their stops.
2. Inspect the attached cables for any binding or kinks.
3. Verify that the CMA extends fully from the slide-rails.
4. Push the server back into the rack.
When the server is fully extended, you must release two sets of slide-rail stops to
return the server to the rack:
a. The first set of stops are levers, located on the inside of each slide-rail, just
behind the back panel of the server. These levers are labeled “PUSH.” Push in
both levers simultaneously and slide the server toward the rack.
The server travels approximately 15 inches (38 cm) and stops.
Verify that the cables and the CMA retract without binding before continuing.
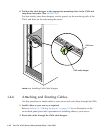
b. The second set of stops are the slide-rail release buttons, located near the front
of each mounting bracket. See
FIGURE 1-7. Simultaneously push or pull both of
the slide-rail release buttons and push the server completely into the rack until
both slide-rail locks engage.
5. Adjust the cable hangers and CMA as required.
6. Continue with Section 1.5, “Cabling the Server” on page 1-17.
1.5 Cabling the Server
Connect the server and external devices in this order (see FIGURE 1-14):
1. Connect the server power cord to a grounded electrical outlet.
2. If needed, connect the keyboard and mouse to the USB connectors on the front or
back panel.
3. If needed, connect the monitor cable to the onboard video connector.


