


16
TANDBERG Videoconferencing SystemInstallation
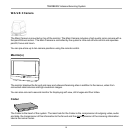
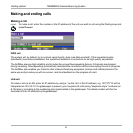
Monitor configuration
Power on the monitor and use the monitor remote control to select the Audio/Video input used (refer to your
monitor manual). Remember to select S-video (S-VHS) input to avoid a black and white picture.
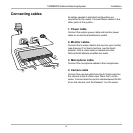
6. LAN cable
• To use the system on LAN, connect a LAN cable from the ‘Ethernet’ connector on the system to your LAN.
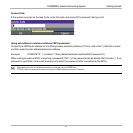
TANDBERG/LOEWE 33”/29” (PAL) monitor
For the TANDBERG/LOEWE monitor external input 1 (199 AV1) is automatically selected.
If ‘199 AV1’ is not selected, press the +/- buttons in front of the monitor until ‘199 AV1’ is selected.
The monitor will automatically remember its last setting.
IMPORTANT: When switching on the monitor keep the button pressed for 2 seconds. The monitor will then
start correctly (green light). If not, the monitor will only go to stand-by mode (red light).
If power is lost, the monitor will enter standby mode when it is connected to power again. Follow the
procedure above.
5c. Other networks - using the External Network interface
If you are using other networks, please refer to ‘External Network Settings’ and ‘Appendix 2’.
5a. ISDN cables - using BRI interface
Connect the ISDN cables to the ISDN sockets (S/T-interface) provided by the service provider. Your main number
will be the number associated with the socket to which ISDN cable number 1 is connected.
THE SYSTEM DOES NOT HAVE A BUILT-IN NETWORK TERMINATOR. IF YOUR WALL SOCKET PROVIDES YOU WITH AN ISDN U-INTERFACE, YOU WILL NEED
AN NT1 BETWEEN YOUR SYSTEM AND YOUR ISDN LINE, SEE A PPENDIX 1.
5b. ISDN cable - using the PRI interface
If you are using the PRI interface, the E1/T1 cable should be connected to a CSU (Channel Service Unit). You will need
a CSU between your system and the PRI line from your network provider, see Appendix 3.
NOTE