


Toshiba TRR
4/00, Tecra
Page 27
Tecra 750 Series Disassembly Overview, (cont.)
CAUTION: When you remove the FL, be
careful not to let any dust or other foreign
matter contaminate the LCD panel. Any
contamination can affect the performance of
the unit.
To remove the FL, follow the steps below.
1. Turn off the power to the computer.
Disconnect the AC adapter and all
external cables connected to the
computer.
2. Remove the battery pack, display mask,
FL inverter board, LCD module, and
microphone.
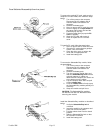
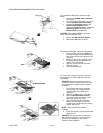
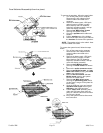
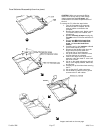
3. Remove one strip of tape securing the
FL cable to the LCD frame and lift the FL
cable.
4. Remove two M2x4 thin-head silver
screws, one M2x1 thin-head black
screw, and four thin-head silver
screws.
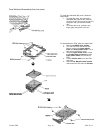
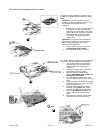
5. Carefully peel up the insulator adhered
to the circuit boards and ICs.
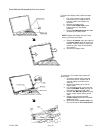
6. Disconnect the flexible cable from the
larger board and press down the
connector flap to avoid damage.
7. Lift up the center of the metal FL cover
until two latches are released.
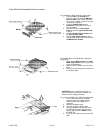
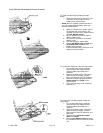
8. Insert a thin object such as the end of
tweezers under the metal FL cover until
the cover is freed.
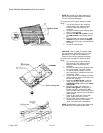
9. Lift up on the metal projections and pull
the FL cover slightly forward, slide it left,
and lift it out.
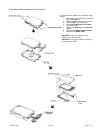
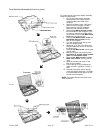
10. Carefully lift up the white sheet covering
the FL.
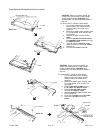
11. Lift out the pink FL cable connector.
12. Lift the white FL cable out of its groove
to remove the FL with cables.
î
ê
í
Images continued on the next page
î