


Toshiba TRR
4/00, Tecra
Page 17
Tecra 750 Series Disassembly Overview, (cont.)
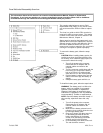
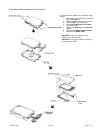
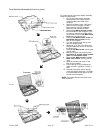
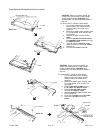
To assemble the HDD pack, follow the steps
below.
1. Connect the flexible cable connector
to the HDD.
2. Seat the HDD into the metal cover and
secure four M3x4 flat-head screws.
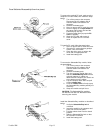
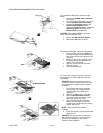
3. Connect the connector cover to the
flexible cable connector. When
seating the connector cover, match the
positioning pins to the holes on the
flexible cable and metal cover.
CAUTION: Don’t hold the HDD by its flat sur-
faces. It may damage the HDD.
4. Secure four M2.5x6 silver screws.
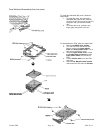
5. Mount the cover onto the HDD.
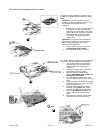
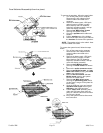
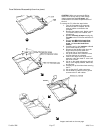
To install the HDD pack, follow the steps below.
1. Align the HDD pack with a marker on
the computer and seat the HDD so that
tabs on the HDD fit into notches on the
computer.
2. Make sure the cover is pushed fully to
the right and push the HDD back to
ensure a firm connection.
3. Slide the cover to the left to lock the
HDD into the slot.
4. Install the battery pack.
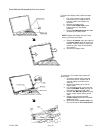
í
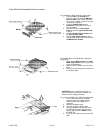
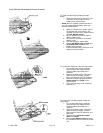
NOTE: There could be two memory
modules.
5. Grasp the memory module by the sides
and pull it out.
CAUTION: Do not try to remove a memory
module(s) with the computer turned on. You
can damage the computer and the memory
module(s).
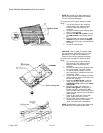
1. Turn off the power to the computer.
Disconnect the AC adapter and all
external cables connected to the
computer.
2. Remove the battery pack, and HDD.
3. Remove two M2x3 silver screws
securing the memory module socket
cover and remove the cover.
4. Use a slender object to press two
latches on either side of a memory
module to the outside and the memory
module will pop up.
To remove the memory module(s), make sure
the computer is in boot mode and follow the
steps below.
CAUTION: Do not touch the connectors on
the memory module(s) or on the computer.
Debris on the connectors may cause
memory access problems.
î