


Toshiba TRR
4/00, Tecra
Page 15
Tecra 750 Series Disassembly Overview, (cont.)
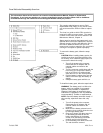
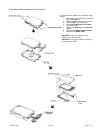
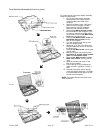
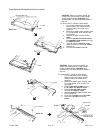
To assemble the FDD, follow the steps below.
1. Seat the FDD in the bracket and
secure the bracket with four M2.5x2.8
black screws in the order numbered
on the case. Tighten screws to a torque
of less than 2.2 kgfcm.
2. Insert the flexible cable into the
connector. Press gently to ensure a
firm connection.
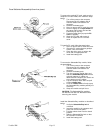
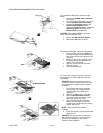
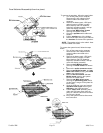
3. Seat the FDD in the lower plastic
frame and set the upper shield cover
in place.
4. Seat the flexible cable connector into
the lower plastic frame.
5. Set the upper plastic frame in place,
snap the two latches closed and secure
six M2x6 silver screws.
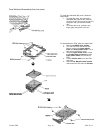
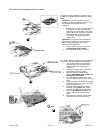
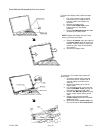
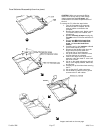
To disassemble the CD-ROM drive, follow the
steps below.
1. Remove four M2x3 screws and three
M2x6 silver screws securing the frame
to the CD-ROM drive.
2. Slide the drive partially out of the drive
frame.
3. Remove the connector cover and lift out
the flexible cable.
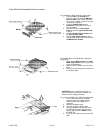
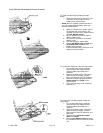
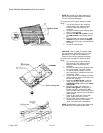
CAUTION: Be very careful not to press on
the top or bottom of the HDD. Pressure can
destroy data or damage the drive.
To remove the HDD pack, follow the steps below.
1. Turn off the power to the computer.
Disconnect the AC adapter and all
external cables connected to the
computer.
2. Remove the battery pack.
3. Turn the computer upside down.
4. Slide the cover to the right and push
the HDD pack forward until the back
edge is aligned with a marker next to
the HDD slot.
5. Lift up on the cover to remove the HDD
pack.