


4/00, TecraToshiba TRR Page 20
Tecra 750 Series Disassembly Overview, (cont.)
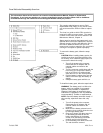
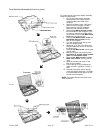
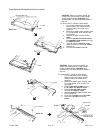
To remove the top cover with display assembly,
follow the steps below.
1. Turn off the power to the computer.
Disconnect the AC adapter and all
external cables connected to the
computer.
2. Remove the battery pack, HDD pack,
optional memory module, modem
board, backup and RTC batteries,
keyboard, and membrane switch.
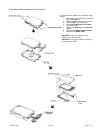
3. Remove four M2.5x10 silver screws
from the bottom of the computer. If you
are going to remove the middle frame,
you must also remove one M2x3 silver
screw from the memory slot.
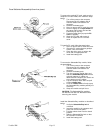
4. Remove one M2.5x4 silver screw and
two M2.5x6 silver screws from the
back of the computer.
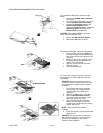
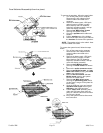
5. Turn the computer right side up and
open the display panel.
6. Slightly lift up on the LCD cable cover
and pull forward to remove it. Remove
the plastic lens.
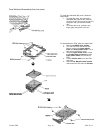
7. Remove one M2x6 screw securing the
ground cable.
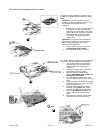
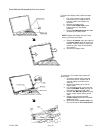
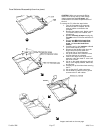
8. Remove the tape and disconnect the
LCD cable, FL inverter cable, speaker
cable, and microphone cable.
9. Remove four M2x6 screws and four
M2x3 silver screws securing the top
cover.
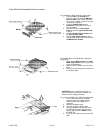
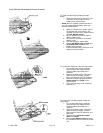
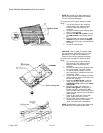
10. Open the camera port cover on the
back of the computer.
11. Pull out the top cover just below the
video connector (yellow) to release a
latch.
12. Carefully lift the back side of the top
cover with display assembly. Lift slowly
to avoid damage to two latches on the
left side of the computer.
NOTE: Be careful that the sound port cover
does not fall off.
î
ê
è
í