


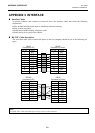


APPENDIX 4 SYSTEM MODE
EO1-33029
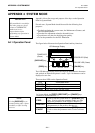
A4.3 Self-Diagnostic Test
A4- 4
A4.3 Self-Diagnostic
Test (Cont.)
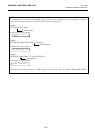
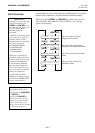
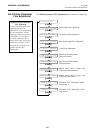
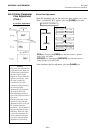
Self-Diagnostic Test and the result print out
When the Maintenance Counter/Parameter Settings is printed, the
message returns to “<1>DIAG. Vx.x”. Press the
[PAUSE]
key twice.
The Self-Diagnostic Test is ready. Press the
[PAUSE]
key to start.
The printer starts the Self-Diagnostic Test, and prints out the result.
After printing is completed, the display returns to “<1>DIAG. Vx.x”.
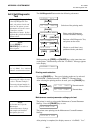
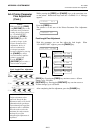
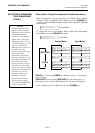
Print head element check
When the Self-Diagnostic Test result is printed, the message returns to
“<1>DIAG. Vx.x”. Press the
[PAUSE]
key twice and
[FEED]
key
twice.
The printer is ready to check the print head to see if there is any problem
with the print head. Press the
[PAUSE]
key to start.
The printer starts checking the print head.
If there is no problem with the print head, the print head check is
complete. Press the
[PAUSE]
key to return to “<1>DIAG. Vx.x”.
If there is a problem with the print head, the following message is
displayed.
Press the
[PAUSE]
key to return to “<1>DIAG. Vx.x”.
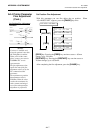
NOTES:
• If an error occurs, an error
message appears, and the
printer stops printing. After
clearing the error, press the
[PAUSE]
key to return to
“<1>DIAG.”. The printer
does not resume printing
automatically.
•
See Section A4.7.2 for Self-
Diagnostic Test Print
sample with detailed
descriptions
.
+($'&+(&.
&+(&.,1*
1250$/(1'
+($'(5525
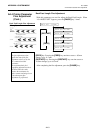
NOTES:
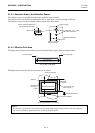
• Make sure that the Top Cover
is closed before starting the
print head check.
• If “HEAD ERROR” appears,
then print head elements may
be damaged. To substain high
quality printing, please
contact your nearest
TOSHIBA TEC service
representative for the print
head replacement.
• The print head element check
can be performed at the
power on time. For selecting
this function, refer to Section
A4.4 Parameter Setting.
$872',$*1267,&
&+(&.,1*35,17