


13
PREPARATION
POWER ON/OFF
SOURCE
C1
C2
DVI
D
DVI
A
S
V
COMP1 COMP2
DVI-D
DVI-AVIDEOS-VIDEO
ASPECT
16:9
16:9
4:3
4:3
ZOOM
ZM
REAL
REAL
DYN
DYNAMIC
1
2
3
ENTER
EXIT
MENU
CONTRAST
BRIGHT COLOR TINT
COLOR
TEMP
GAMMA
SHARPNESS
LIGHT
LIGHT
SHGAM
TEM
TIN
COL
BRICNT
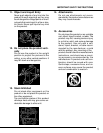
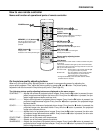
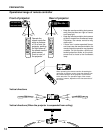
Directional button:
Used to shift menu item and adjust values.
Picture quality adjusting button:
(See below)
POWER button:
MENU button:
Displays menu.
Erases the menu when pressed again.
ENTER button:
Used to determine menu item.
22
18
2218
27
25
20
25
25
25
LIGH button:
Switches between LIGHT modes of remote controller every time
it is pressed.
If the remote controller button lights up when the LIGHT button
is pressed, the dark-room mode is brought into ON. If it does not
light up, the normal mode is ON.
Dark room mode : All the buttons on the remote controller light
up if any of the buttons is pressed.
Normal mode : Any of the buttons on the remote controller
does not light up if any of the button is
pressed (Except for LIGHT button).
• The light automatically comes off a while after the remote
controller button is released.
MEMORY (1, 2, 3) buttons:
Set the pre-stored values in the
picture adjustment menu when
pressed.
SOURCE button:
Selects an input video signal to be
projected.
ASPECT button:
Selects size of the video image according to
the video signal to be projected.
EXIT button:
Displays the menu in one-level higher
hierarchy when pressed.
How to use remote controller
Name and function of operational parts of remote controller
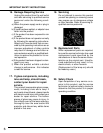
On the picture quality adjusting buttons
When any of the picture quality adjusting button is pressed, its corresponding screen for adjusting the
picture quality appears. Then, adjust the picture quality by pressing % and $ button. The picture quality
adjustment can also be made in the picture quality menu. (See Page 26.)
The following picture quality adjusting buttons are displayed on the menu screen:
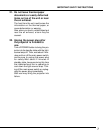
CONTRAST ......... Adjusts the contrast of projected picture images. Every time the % button is pressed, the pro-
jected image becomes brighter and more vivid. Every time the $ button is pressed, the pro-
jected image becomes darker and less vivid.
BRIGHT................ Adjusts the brightness of projected picture images. Every time the % button is pressed, the
projected image becomes brighter. Every time the $ button is pressed, the projected image
becomes darker.
COLOR ................ Adjust the color thickness of projected picture image. Every time the % button is pressed, the
projected image color becomes thicker. Every time the $ button is pressed, the projected
image color becomes thinner.
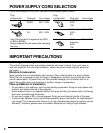
TINT ..................... Adjusts the tint of projected picture images. Every time the % button is pressed, the skin color
of projected image becomes more reddish. Every time the $ button is pressed, the skin color
of projected image becomes greenish.
COLOR TEMP ..... Selects one of the preset color temperatures.
GAMMA ................ Selects one of the preset gamma corrections.
SHARPNESS ....... Adjusts the sharpness of projected picture images. Every time the % button is pressed, the
projected picture image becomes sharper. Every time the $ button is pressed, the projected
picture image becomes softer.