


TVP-221H User’s Guide
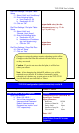
Web Configuration of Internet Access
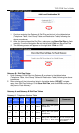
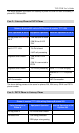
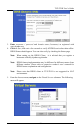
Internet Access / PPPoE
1. Select “Yes” to enable PPPoE
function
2. Enter username and
password provided by your
ISP
3. Click on “Save”
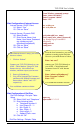
Internet Access / Dynamic DNS
4. Select Enable
5. Enter Server Name, Host
Name, User Name, Password
(eg. dyndns.org tvp1
username1 password1)
6. Click on “Save”
7. Click on “Store”
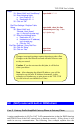
Web Configuration of Dial Plan
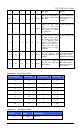
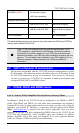
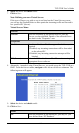
Dial Plan Settings / Dial plan Table
Setup
8. Select “Add” and “Telephone”
9. Enter following fields
a. Telephone Number :22
b. Hunt Group ID: 22
c. Min. Digits: 2
d. Max. Digits: 5
e. Strip Length: 2
f. Append Prefix: none
10. Click on “OK”
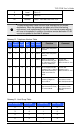
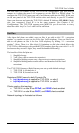
Enter “telnet 192.168.0.1”
Enter Username “admin”
Enter “123”
net set pppoe on
net set pppoe user_name [user_name]
net set pppoe pw [my_password]
net set dyndns on
set dyndns add [serv_name]
[host_name] [user_name] [password]
(eg. dyndns.org tvp1 username1
password1)
config activate
config store
58
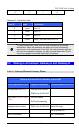
atpm req
atpm aadd 22 2 5 22 2
atpm hadd 22 2 22
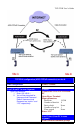
From the local connection, you could
continue setting up the dial plan.
However you could choose to reboot.
Once Internet Access is setup, you could
choose to reboot and then reconnect
using an PC with internet access:
1. Click on “Reboot”
On your PC, close all browser windows,
before reopening.
2. Enter tvp1.dyndns.org
3. You will be prompted for Username
and Password. Default Username
and Password are “admin” and
“123” respectively.
You would then continue as below:
Enter “net reset”
Enter “telnet tvp1.dyndns.org”
Enter Username “admin”
Enter “123”
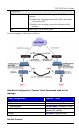
Using a RJ45 Cat 5 cable, connect your
TVP-221H directly to your ADSL /
Cable Modem and initiate new Telnet
session from a PC with internet Access:
You would then continue as below: