


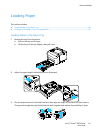
Installation and Setup
60 Xerox
®
Phaser
®
6022 Printer
User Guide
Enabling HTTPS Communication
1. At your computer, open a Web browser, in the address field, type the IP address of the printer, then
press Enter or Return.
2. Click Properties.
3. Select Security > SSL/TSL Communication.
4. To configure the printer to create a digitally signed certificate, click Create New Certificate.
5. To select the DKIM signature type, for Public Key Method, select RSA/SHA-256 or RSA/SHA-1.
6. To select the size of the key, for Public Key Size, select the number of bits.
7. For Issuer, type the name of the organization that issues the certificate.
8. To set the number of days that the certificate is effective, for Validity, enter a number.
9. Adjust the parameters of the new digital certificate as needed, then click Generate Certificate.
10. For the new settings to take effect, restart your printer.
Note: After you generate a signed certificate, Certificate Management appears in the Security
menu.
11. In the address bar, type the IP address of the printer, then press Enter or Return.
12. To display the SSL page, select Properties > Security > SSL/TSL Communication.
13. Ensure that Enabled SSL is selected.
Viewing the Digital Certificate Purpose
1. At your computer, open a Web browser, in the address field, type the IP address of the printer, then
press Enter or Return.
2. In CentreWare Internet Services, click Properties.
3. In the Properties pane, to expand the menu, click the plus (+) symbol next to the Security folder.
4. Click Properties.
In the navigation panel, scroll to Security, then select Certificate Management.
Deleting a Digital Certificate
1. At your computer, open a Web browser, in the address field, type the IP address of the printer, then
press Enter or Return.
2. Click Properties.
3. In the navigation panel, click Security > SSL/TLS Server Communication, then click Delete All
Certificates.
4. To confirm, click Delete.