


Scanning
Xerox® WorkCentre® 3655 Multifunction Printer 107
User Guide
Scanning to a USB Flash Drive
You can scan a document and store the scanned file on a USB Flash drive. The Scan to USB function
produces scans in .jpg, .pdf, and .tiff file formats.
To scan to a USB Flash drive:
Note: Before pressing the Scan button or inserting the USB Flash drive, press the Power Saver
button, then wait until the Power Saver indicator turns off.
1. Load the original on the document glass or in the duplex automatic document feeder.
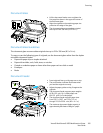
2. Insert your USB Flash drive into the USB port on the side of the printer.
The USB Drive Detected message appears on the touch screen.
3. Touch Scan to USB.
4. To change scan settings, touch the appropriate buttons. For details, see Adjusting Scanning Settings
on page 115.
5. Touch the Workflow Scanning tab.
6. To change the file name, touch File Name, type the name, then touch OK.
7. To select a file format:
• Touch the Filing Options tab, then touch File Format.
Touch an option, then touch OK.
8. To begin the scan, press Start.
WARNING: Do not remove the USB Flash drive until prompted. If you remove the Flash drive before
the transfer is complete, the file can become unusable and other files on the drive can be damaged.