


Scanning
Xerox® WorkCentre® 3655 Multifunction Printer 111
User Guide
Scanning to an Email Address
Before scanning to an email address, set up the printer up with the email server information. For details,
see the System Administrator Guide at www.xerox.com/office/WC3655docs.
To scan an image and send it to an email address:
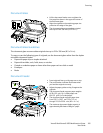
1. Load the original on the document glass or in the duplex automatic document feeder.
2. Press the Services Home button, then touch Email.
3. Touch the Email tab.
4. Specify the method for selecting recipients:
− New Recipient: Allows you to enter the email address manually. To enter the address, use the
keypad.
− Favorites: Allows you to select from the Device Address Book.
− Network Address Book: Allows you to select an email address from the network address book.
5. When you are finished, touch Close.
6. To add a subject line:
• Touch Subject, then use the touch screen keyboard to type the desired text.
Touch OK.
7. To add a message:
• Touch the Email Options tab.
Touch Message.
Type the Message text for the body of the email.
Touch OK.
8. To select a file format:
• Touch the Email Options tab.
Touch File Format.
Touch an option, then touch OK.
9. To change the file name, touch File Name, type the name, then touch OK.
10. To change scan settings, touch the appropriate buttons. For details, see Adjusting Scanning Settings
on page 115.
11. To begin the scan, press the Start button.