


Scanning
110 Xerox® WorkCentre® 3655 Multifunction Printer
User Guide
Scanning to a Folder on a Network Computer
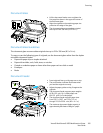
1. Load the original on the document glass or in the duplex automatic document feeder.
2. At the printer control panel, press the Services Home button.
3. On the printer control panel, touch Scan to.
4. Touch Network.
5. Touch the address book entry.
6. Touch OK.
7. To change scan settings, touch the appropriate buttons. For details, see Adjusting Scanning Settings
on page 115.
8. To change the file name, touch File Name, type the name, then touch OK.
9. To select a file format:
• Touch the Filing Options tab, then touch File Format.
Touch an option, then touch OK.
10. To begin the scan, press Start. The printer scans your image to the folder you specified.