


16
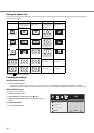
Setting the aspect ratio
You can change the aspect ratio of the input video signal (or the ratio of width to height of the image). Change the setting according to the type
of the input video signal.
Bold frames are recommended modes.
Changing the settings
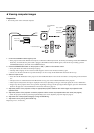
With the remote control:
1. Press the ASPECT button.
• Every time the ASPECT button is pressed, the aspect mode changes from DEFAULT to NORMAL, to SQUEEZE, to ZOOM, to
THROUGH, and back to DEFAULT. DEFAULT is automatically set to either NORMAL or SQUEEZE depending on the input signal.
With the INITIAL menu:
(See page 19 for menu setting.)
1. Display the INITIAL menu.
2. Select ASPECT by pressing the or button.
3. Select your desired aspect ratio by pressing the or
button.
To cancel the menu:
4. Press the MENU button.
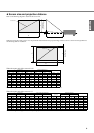
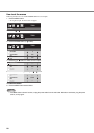
NORMAL SQUEEZE ZOOM THROUGH
Original image size Projects images with
an aspect ratio of 4:3
when the input signal
is 4:3 image.
Projects images with
an aspect ratio of
16:9.
Projects images in the
CinemaScope size or
Vista size together
with subtitles.
Projects images in
their original size as
input.
4:3 image (480i, 576i,
480p, 576p, and PC)
Available only when
the input signal is 480i,
576i, 480p or 576p.
4:3 CinemaScope and
Vista image
Available only when
the input signal is 480i,
576i, 480p or 576p.
Squeezed 4:3 (480i,
576i, 480p, 576p)
Available only when
the input signal is 480i,
576i, 480p or 576p.
16:9 image (1080i)
Not available. Not available.
16:9 image (720p)
Not available. Not available.
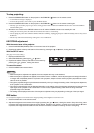
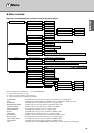
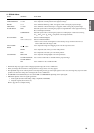
INITIAL
UPPER LEFT
AUTO
AUTO
DEFAULT
MENU POSITION
PROGRESSIVE
MODE
COLOR SYSTEM
ASPECT
TV60