


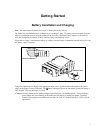

Getting Started
Host Interface Set Up
Prior to using your printer with a computer application, check the interface settings to be sure they match those
required by your host system.
Each printer is equipped with a Serial RS-232C interface which is selected by default. Additionally, the printer
may also be equipped with either an IrDA interface, Bluetooth interface, or Wi-Fi interface. The model
description on the serial number label will indicate if one of the optional interfaces is installed. The factory
defaults for the basic settings for each interface are listed below.
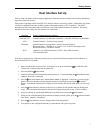
Interface Factory Default Interface Settings
Serial RS-232C Printek Emulation, 38,400 Baud, 8 Data Bits, 1 Stop Bit, No Parity, No Handshake
IrDA Printek Emulation. No other set up required.
Bluetooth Printek Emulation, Pairing Mode = Paired, Security Disabled,
Bluetooth Name = “MtP400-xxxx” where “xxxx” is the last four digits of the
Bluetooth interface’s hardware Address.
Wi-Fi Connect to any SSID, Infrastructure, WEP = None, DHCP enabled,
TCP tunnel port 8023.
If the above settings do not sufficiently match your host system, the following instructions describe how to
access the Interface Set Up Menu.
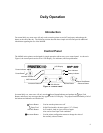
1. Make sure the printer is powered off. If the printer is on, press and hold the
Power Button until
“Printer Off” is displayed to turn the printer off.
2. Press and hold the
Enter Button.
3. Continue to hold the Enter Button and turn the printer on. Continue holding the Enter Button until
“
Menus Active” is displayed.
4. Press the
Advance Button until “Interface Menu” is displayed. If necessary, you may toggle
between the Serial interface and the optional interface (if installed) by pressing the
Increment
Button. Note that the interface that is displayed is the interface that will be used when you exit set up
mode.
5. Press the
Enter Button to advance to the first set up feature for the interface that was displayed in
step 4. Only the features that pertain to the interface displayed/selected in step 4 will be available.
6. You may continue to step through additional set up features by pressing the
Enter Button.
7. When you have finished setting the parameters to match you host system, press the
Advance Button
until “
Exit Menus” is displayed.
8. Press the Enter Button to save the changes and exit the Setup Mode.
9. Your printer is now configured and ready to communicate with your host system.
7