


Interfacing To A Host Computer
Every MtP400 is equipped with an RS-232C Serial Interface. Optional factory installed interfaces are also
available for IrDA (Infrared), Bluetooth®, and Wi-Fi®. When the printer is equipped with one of the optional
interfaces, the interface that is selected in the
Interface Menu as described on page 21 is the one that will be
active and the other interface will be ignored.
Note: To print out configuration information for the currently selected interface, you may press and hold
the
Enter Button until “Printing Setup” is displayed.
Note: To switch back-and-forth between the RS-232C Serial interface and an optional interface (if
installed), you may continue to the
Enter Button until “Interface Now ‘interface’” is displayed.
After the
Enter Button is released, the alternate ‘interface’ will be selected and the setup
information for the newly selected interface will be printed. (This is merely a shortcut method and
accomplishes the same result as using the Interface Configuration Menu. This feature was added in
printer firmware version 2.1.)
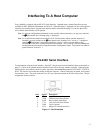
RS-232C Serial Interface
To communicate using the Serial interface, “Serial” must be selected in the Interface Menu as described on
page
22. If there is no optional interface installed, Serial will be the only interface available. When using the
Serial interface, the baud rate, data bits, parity, stop bit(s), and handshaking method (XON/XOFF, ETX/ACK,
RTS/CTS) must be set to match the settings on the host computer. If these settings do not match, errors and/or
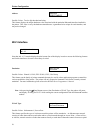
lost data may occur. The serial connector is an “RJ” type connector located on the side of the printer. The pin
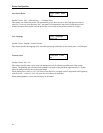
assignments are shown below.
Pin # Signal Description
1 COM Logic Common
2 TXD Transmit Data (From Printer)
3 RXD Receive Data (From Host)
4 CTS Clear To Send (From Printer)
5 COM Logic Common
6 RTS Request To Send (From Host)
Figure 11 - Serial Interface
31