


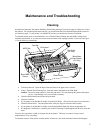


Maintenance and Troubleshooting
Testing the Power Supply and Battery
To verify that the printer’s internal battery charger is functioning properly, perform the following steps.
• Test the power adapter (100-240VAC/50-60Hz, 12/24VDC adapter) with a voltmeter to verify that its
output voltage is 9 VDC.
• Connect the power supply to a power source and then connect it to the printer.
• Verify that the printer’s
Battery Indicator is illuminated. If illuminated, the charging circuit is
functioning properly.
Note: that if the battery is already fully charged, the
Battery Indicator will turn off after a short
time.
• After the battery has been charged for five minutes, disconnect the power supply.
• Perform a printer Self-Test.
o Make sure the printer is turned off. The power indicator will be off and the LCD Display will
be blank.
o Press and hold the
Paper Feed Button.
o Continue holding the
Paper Feed Button and turn the printer on using the Power Button
until “Printing Current Menu Values” is displayed.
• If the printer successfully prints the Self-Test, the battery is functional. If the Self-Test does not
complete and the printer turns itself off, repeat this test with a known good battery.
• Once this test has completed successfully, allow the battery to fully charge. At the end of this time the
Battery Indicator will turn off.
Note: If the printer is turned on, the battery status shown in the bottom right corner of the LCD
display will always show a “full” battery whenever the printer is connected to the power
supply.
If the printer and battery do not appear to successfully pass these tests, refer to the Troubleshooting section for
possible causes and solutions.
Note: This test only verifies that the power adapter, the internal charging circuit, and the battery are
functioning properly. This test does not provide a valid indication of the relative capacity of the battery
or how long it may hold a charge.
39