


13
Positioning the Switch
When deciding where to position the Switch ensure that:
■ It is accessible and cables can be connected easily.
■ Cabling is away from sources of electrical noise. These include
lift shafts, microwave ovens, and air conditioning units.
Electromagnetic fields can interfere with the signals on copper
cabling and introduce errors, therefore slowing down your
network.
■ Water or moisture cannot enter the case of the unit.
■ Air flow around the unit and through the vents in the side of
the case is not restricted (3Com recommends that you provide
a minimum of 25 mm (1 in.) clearance).
■ The air is as free from dust as possible.
■ Temperature operating limits are not likely to be exceeded. It
is recommended that the unit is installed in a clean, air
conditioned environment.
It is always good practice to wear an anti-static wrist strap when
installing network equipment, connected to a ground point. If
one is not available, try to keep in contact with a grounded rack
and avoid touching the unit's ports and connectors, if possible.
Static discharge can cause reliability problems in your equipment.
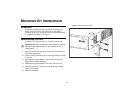
Rack Mounting or Free Standing
The unit can be mounted in a 19-inch equipment rack using the
Mounting Kit, (refer to “Mounting Kit Instructions” on page 17),
or it can be free standing. Do not place objects on top of the
unit or stack.
CAUTION: If installing the Switch in a free-standing stack of
different size Baseline or Superstack 3 units, the smaller units
must be installed above the larger ones. Do not have a
free-standing stack of more than six units.
Power Supply
Power problems can be the cause of serious failures and
downtime in your network. Ensure that the power input to your
system is clean and free from sags and surges to avoid
unforeseen network outages. We recommend that you install
power conditioning, especially in areas prone to black outs,
power dips and electrical storms.
The unit is intended to be grounded. Ensure it is connected to
earth ground during normal use. Installing proper grounding
helps to avoid damage from lightning and power surges.
Power Up
Use the following sequence to power up the Switch:
1 Check the network connections and cables.
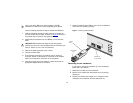
2 Connect the power supply cable to the appropriate power socket
on the rear panel of the unit; refer to “Power Supply” on
page 11.
3 Connect the plug to the power supply outlet socket and switch
on the power supply at the socket.
When the Switch is powered on, the Power LED should light up.
If it is not, refer to “Power LED” on page 11.
INSTALLATION RECOMMENDATIONS