


Hardware Maintenance 79
Hardware
Maintenance
Replacing AC PSU
c
CAUTION: The PSU of the Switch 8800 Family is hot-swappable.
When installing or replacing a PSU while power is being supplied, you must take
care in the operation procedures and safety with electricity. Do not touch any
naked wires, terminals or any parts of the product marked with a dangerous
voltage label to avoid bodily injury.
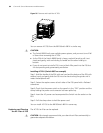
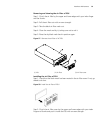
Removing AC PSU (Switch 8807 as example)
Step 1: Put the power switch on the PSU from the ON position into the OFF
position.
Step 2: Pull right the clamp holding the power cord connector and unplug the
power cord.
Step 3: Unscrew the captive screws on the both sides of the PSU panel with a
flathead screwdriver.
Step 4: Hold the handle of the PSU and pull the PSU gently out of the chassis
along the guides.
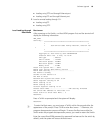
Table 75 Description of I/O module LEDs
Indicator State description
RUN ON indicates I/O module failure.
OFF indicates that the I/O module has failed or it is not in position
at all.
Blinking indicates that the I/O module is working normally.
ALM OFF indicates that there is no I/O module alarm or the I/O module is
not in position at all.
ON indicates that there is I/O module alarm.
2~6 (Switch 8807)
0~3, 6~9 (Switch 8810)
0~5, 8~13 (Switch 8814)
On Switch 8807, I/O module 0 through I/O module 4 respectively
correspond to slots 2 through 6.
On Switch 8810, I/O module 0 through I/O module 7 respectively
correspond to slots 0 through 3 and 6 through 9.
On Switch 8814, I/O module 0 through I/O module 11 respectively
correspond to Slots 0 through 5 and 8 through 13.