


80 CHAPTER 6: SWITCH MONITORING AND MAINTENANCE
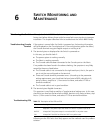
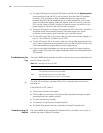
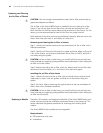
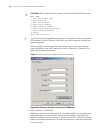
Figure 56 Remove and install the AC PSU
You can remove AC PSU from the 8810/Switch 8814 in similar way.
c
CAUTION:
■ The Switch 8800 Family uses multiple power systems, and you must turn off all
of them when removing the AC PSU.
■ As the PSU of the Switch 8800 Family is heavy, use both hands to pull it out
slowly and gently, with one holding its handle and the other holding its
bottom.
■ If you do not want to install a PSU, insert a blank filler panel into the PSU slot
for dust-proofing and guaranteeing ventilation.
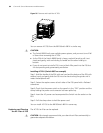
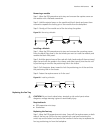
Installing AC PSU (Switch 8807 as example)
Step 1: Hold the handle of the PSU with one hand and the bottom of the PSU with
another hand, and gently slide the PSU into the chassis along the guides until it
mates the backplane well.
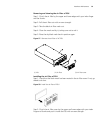
Step 2: Fasten the captive screws at both sides of the PSU panel with a flathead
screwdriver.
Step3: Check that the power switch on the panel is in the “OFF” position and the
clamp holding the power cord connector has been pulled up.
Step 4: Insert the AC power cord accompanied the Switch into the socket on the
PSU.
Step 5: Pull the clamp down to hold the power cord.
You can install AC PSU to the 8810/Switch 8814 in same way.
Replacing and Cleaning
the Air Filter of PSU
The AC PSU air filter can be replaced.
c
CAUTION: We strongly recommend that you clean the air filter semimonthly to
guarantee adequate ventilation.