


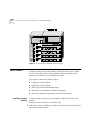

Power Supply Module
31
Installing a Power
Supply Module
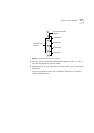
To install a power supply module:
1
Orient the module so that its sides enter the guides on either side of the
chassis slot.
2
Slide the module into the chassis until the face panel is flush with the
enclosure.
3
Secure the screws on either side of the front panel.
4
If a redundant power supply is not installed in the second power supply
slot, cover the slot with a blank panel for safety.
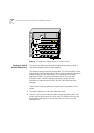
Replacing a
Redundant Power
Supply Module
You can replace the redundant power supply without having to turn off
the system (hot-swap). For more information on the operation of the
redundant power supply module, see “Redundant Power Supply” on
page 85.
To replace a redundant power supply module:
1
Disconnect the power cord from the power supply.
2
Loosen the screws at the extreme right and left of the power supply, near
the handles (see Figure 3).
3
Grasp the handles of the redundant power supply you want to replace
and pull them outward. This ejects the power supply.
4
Remove the new power supply from its antistatic bag. Place the old
power supply in the antistatic bag and set it aside in a safe place.
5
Orient the power supply so its labelling is upright.
6
Insert the power supply into the chassis by placing it between the guides
of the slot and sliding it until it stops.
7
Tighten the power supply’s securing screws.
8
Connect the power cord to the power supply.